Hyundai Kona: Engine and Transaxle Assembly / Engine Mounting Repair procedures
| Removal and Installation |
| 1. |
Remove the engine room under cover.
(Refer to Engine and Transaxle Assembly - "Engine Room Under Cover")
|
| 2. |
Remove the roll rod bracket (A).
|
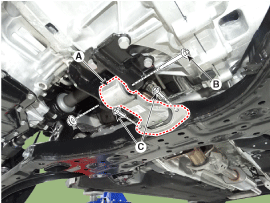
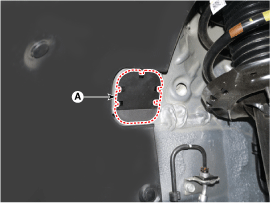
| 3. |
Remove the roll rod mounting support bracket (A).
|
| 4. |
Install in the reverse order of removal.
|
| 1. |
Remove the engine room under cover.
(Refer to Engine and Transaxle Assembly - "Engine room under cover")
|
| 2. |
Install the jack to the edge of upper oil pan to support the engine.
|

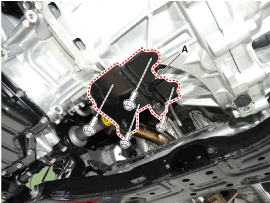
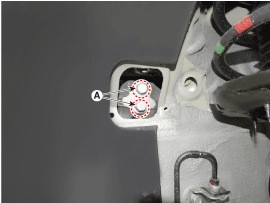
| 3. |
Remove the engine mounting support bracket (A).
|
| 4. |
Remove the reservoir tank.
(Refer to Cooling System - "Reservoir Tank")
|
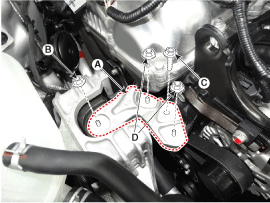
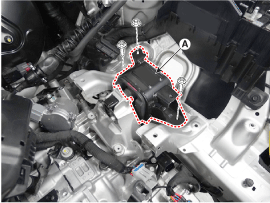
| 5. |
Remove the engine mounting bracket (A).
|

| 6. |
Install in the reverse order of removal.
|
| 1. |
Remove the air duct and air cleaner assembly.
(Refer to Intake and Exhaust System - "Air Cleaner")
|
| 2. |
Remove the battery.
(Refer to Engine Electrical System - "Battery")
|
| 3. |
Remove the ECM.
(Refer to Engine Control / Fuel System - "Engine Control Module (ECM)")
|
| 4. |
Remove the battery tray.
(Refer to Engine Electrical System - "Battery")
|
| 5. |
Remove the engine room under cover.
(Refer to Engine Room Under Cover - "Engine Room Under Cover")
|
| 6. |
Install the jack to the edge of transaxle.
|
| 7. |
Remove the service cover (A).
|
| 8. |
Remove the transaxle mounting bolts (A).
|
| 9. |
Remove the transaxle mounting bracket (A).
|
| 10. |
Install in the reverse order of removal.
|
 Engine Mounting Components and components location
Components
1. Transaxle mounting bracket
2. Roll rod bracket
3. Engine mounting bracket
4. Engine mounting support bracket
...
 Engine and Transaxle Assembly Repair procedures
Removal
•
Use fender covers to avoid damaging painted surfaces.
...
Other information:
Hyundai Kona (OS) 2018-2024 Service Manual: Repair procedures
Teaching Procedures
1.
Key Teaching Procedure
Key teaching must be done after replacing a defective PCM(ECM) or
when providing additional keys to the vehicle owner.
The procedure starts with an PCM(ECM) request for vehicle ...
Hyundai Kona (OS) 2018-2024 Owners Manual: What to expect after an air bag inflates
After a frontal or side air bag inflates, it will deflate very quickly. Air bag
inflation will not prevent the driver from seeing out of the windshield or being
able to steer. Curtain air bags may remain partially inflated for some time after
they deploy.
WARNING
After an air bag inflates, take t ...
