Hyundai Kona: Crash Pad / Glove Box Housing Cover Repair procedures
Hyundai Kona (OS) 2018-2024 Service Manual / Body (Interior and Exterior) / Crash Pad / Glove Box Housing Cover Repair procedures
| Replacement |
|

|

| 1. |
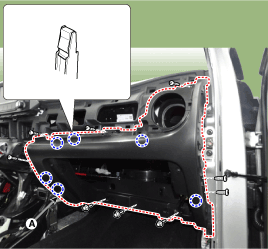
Remove the cowl side trim.
(Refer to Interior Trim - "Cowl Side Trim")
|
| 2. |
Remove the glover box.
(Refer to Crash Pad - "Glove Box")
|
| 3. |
Remove the crash pad garnish assembly [RH]
(Refer to Crash Pad - "Crash Pad Garnish Assembly [RH]")
|
| 4. |
After loosening the mounting screws, nut and bolts, remove the glove
box housing cover (A).
|
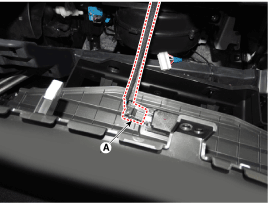
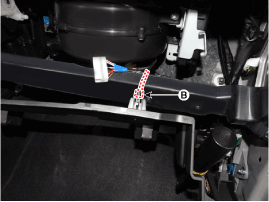
| 5. |
Disconnect the glove box lamp connector (A) and the lamp switch connector
(B).
|
| 6. |
To install, reverse removal procedure.
|
 Glove Box Housing Cover Components and components location
Component Location
1. Glove box housing cover
...
 Main Crash Pad Assembly Components and components location
Component Location
1. Main crash pad assembly
...
Other information:
Hyundai Kona (OS) 2018-2024 Service Manual: Components and components location
Components
1. Cylinder block
2. Ladder frame
3. Crankshaft
4. Crankshaft upper bearing
5. Crankshaft lower bearing
6. Thrust bearing
7. Main bearing cap
8. External damper flywheel
9. Crankshaft sproket
10. Crankshaft pulley
11. Wate ...
Hyundai Kona (OS) 2018-2024 Service Manual: Troubleshooting
Troubleshooting
Symptom
Possible cause
Remedy
Hard steering
Improper front wheel alignment
Correct
Excessive turning resistance of lower arm ball joint
Replace
Lo ...
© 2018-2024 www.hkona.com
