Hyundai Kona: Brake System / Rear Disc Brake Repair procedures
Hyundai Kona (OS) 2018-2024 Service Manual / Brake System / Brake System / Rear Disc Brake Repair procedures
| Removal |
| 1. |
Loosen the wheel nuts slightly.
Raise the vehicle, and make sure it is securely supported.
|
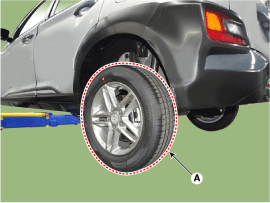
| 2. |
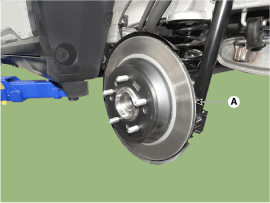
Remove the rear wheel and tire (A) from the rear hub.
|

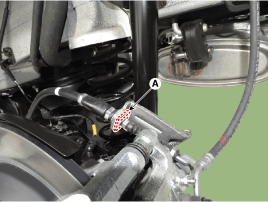
| 3. |
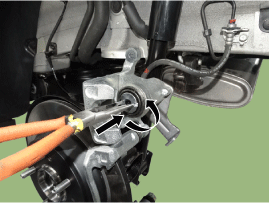
Remove the parking brake cable fixing clip (A).
|
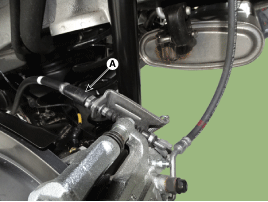
| 4. |
Pull the operation lever as a counterclock-wise direction and then parking
cable (A) from the caliper.
|
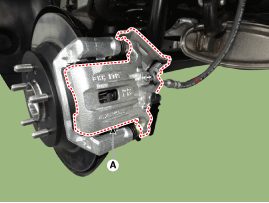
| 5. |
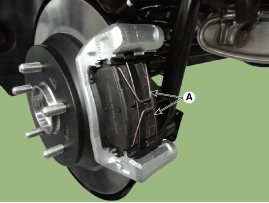
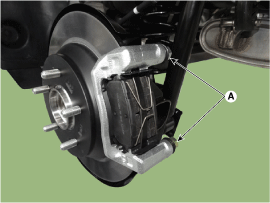
Loosen the guide rod bolts and then remove the caliper body (A).
|
| 6. |
Remove the pad return spring (A).
|
| 7. |
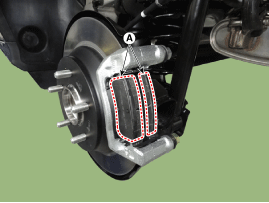
Remove the brake pad (A).
|
| 8. |
Remove the pad retainer (A).
|
| 9. |
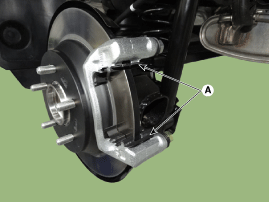
Loosen the caliper mounting bolts and then remove the caliper carrier
(A).
|
| 10. |
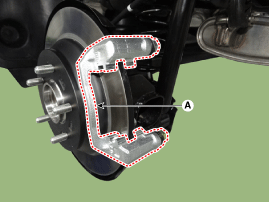
Loosen the screw and then remove the brake disc (A).
|
| Replacement |
Guide rod pin and boot
| 1. |
Loosen the wheel nuts slightly.
Raise the vehicle, and make sure it is securely supported.
|
| 2. |
Remove the rear wheel and tire (A) from the rear hub.
|
| 3. |
Remove the parking brake cable fixing clip (A).
|
| 4. |
Pull the operation lever as a counterclock-wise direction and then parking
cable (A) from the caliper.
|
| 5. |
Loosen the guide rod bolt and then up the caliper body (A).
|
| 6. |
Replace the guide rod and boot (A) with a new one.
|
| 7. |
Install the caliper body (A)
|
| 8. |
Install the rear wheel and tire (A).
|
| Installation |
| 1. |
To install, reverse the removal procedure.
|
| 2. |
When istalling, press and rotate the piston into the caliper body until
it is fully retracted.
|
| 3. |
After installing, bleed the brake system.
(Refer to Brake System - "Brake System Bleeding")
(Refer to Brake System - "ABS System Bleeding")
(Refer to Brake System - "ESP System Bleeding")
|
| Inspection |
Rear Brake Disc Thickness Check
| 1. |
Check the brake disc for damage and cracks.
|
| 2. |
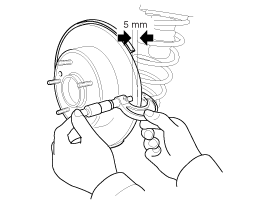
Remove all rust and contamination from the surface, and measure the
disc thickness at 8 points, at least, of same distance (5mm) from the
brake disc outer circle.
|
| 3. |
If wear exceeds the limit, replace the discs and pad assembly left and
right of the vehicle.
|
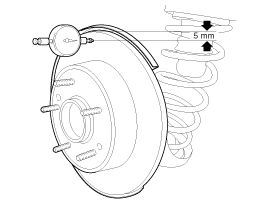
Rear Brake Disc Runout Check
| 1. |
Place a dial gauge about 5mm (0.2 in.) from the outer circumference
of the brake disc, and measure the runout of the disc.
|
| 2. |
If the runout of the brake disc exceeds the limit specification, replace
the disc, and then measure the runout again.
|
| 3. |
If the runout cannot be corrected by changing the position of the brake
disc, replace the brake disc.
|
| Adjustment |
|
| 1. |
Remove the floor console to reach the adjusting nut.
|
| 2. |
Loosen the parking brake cable until both operating levers rest in fully
off position.
|
| 3. |
Bring the brake pads in their operating position by pressing the brake
pedal down several times until there is resistance.
|
| 4. |
Tension the parking brake cable by tightening the adjusting nut, until
the operating levers on both calipers lift from the stop, up to a distance
of (A) and (D) between operating lever (B) and stopper (C).
|

| 5. |
Refit the floor console.
|
| 6. |
Parking brake lever in the car must be in fully loosened position.
|
| 7. |
If the handbrake cables where changed, actuate the parking brake a few
times with maximum force to stretch the parking brake cables, and then
control adjusting as above.
|
| 8. |
Check the wheels of their free operation.
|
| 9. |
Test drive.
|
 Rear Disc Brake Components and components location
Components
1. Brake pad
2. Guide rod pin
3. Guide rod pin boot
4. Caliper carrier
5. Pad retainer
6. Brake pad
7. Pad return spring
...
 Brake Pad Repair procedures
Replacement
Front Brake Pad
1.
Loosen the wheel nuts slightly.
Raise the vehicle, and make sure it is securely supported.
2.
Re ...
Other information:
Hyundai Kona (OS) 2018-2024 Service Manual: Components and components location
Components
1. Body control module (BCM)
2. TPMS sensor (FL)
3. TPMS sensor (RL)
4. TPMS sensor (FR)
5. TPMS sensor (RR)
...
Hyundai Kona (OS) 2018-2024 Service Manual: CVVT (Continuous Variable Valve Timing) System Description and operation
Description
Continuous Variable Valve Timing (CVVT) system advances or retards the valve
timing of the intake and exhaust valves in accordance with the ECM control signal
calculated by the engine speed and load.
By controlling CVVT, the valve over-lap or under-lap occurs, w ...
© 2018-2024 www.hkona.com
