
Hyundai Kona: Rear Glass Defogger / Rear Glass Defogger Printed Heater Repair procedures
| Inspection |
|

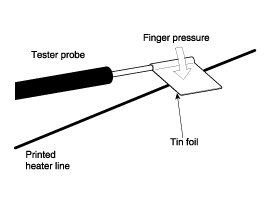
| 1. |
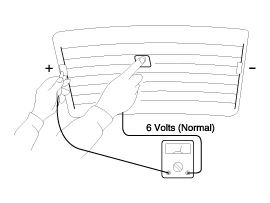
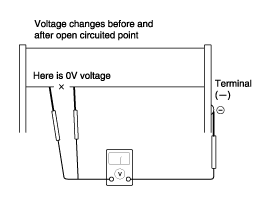
Turn on the defogger switch and use a voltmeter to measure the voltage
of each heater line at the glass center point. If a voltage of approximately
6V is indicated by the voltmeter, the heater line of the rear window
is considered satisfactory.
|
| 2. |
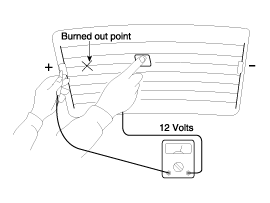
If a heater line is burned out between the center point and (+)
terminal, the voltmeter will indicate 12V.
|
| 3. |
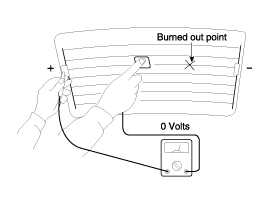
If a heater line is burned out between the center point and (-)
terminal, the voltmeter will indicate 0V.
|
| 4. |
To check for open circuits, slowly move the test lead in the direction
that the open circuit seems to exist. Try to find a point where
a voltage is generated or changes to 0V. The point where the voltage
has changed is the open-circuit point.
|
| 5. |
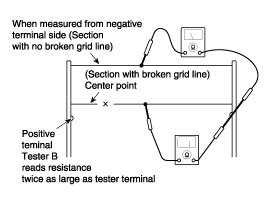
Use an ohmmeter to measure the resistance of each heater line between
a terminal and the center of a grid line, and between the same terminal
and the center of one adjacent heater line. The section with a broken
heater line will have a resistance twice that in other sections.
In the affected section, move the test lead to a position where
the resistance sharply changes.
|
| 1. |
Conductive paint.
|
| 2. |
Paint thinner.
|
| 3. |
Masking tape.
|
| 4. |
Silicone remover.
|
| 5. |
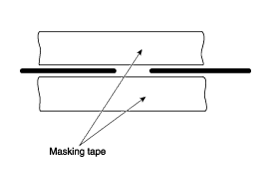
Using a thin brush :
Wipe the glass adjacent to the broken heater line, clean with silicone
remover and attach the masking tape as shown. Shake the conductive
paint container well, and apply three coats with a brush at intervals
of about 15 minutes apart. Remove the tape and allow sufficient
time for drying before applying power. For a better finish, scrape
away excess deposits with a knife after the paint has completely
dried. (Allow 24 hours).
|
 Components and components location
Component Location
1. Body control module
(BCM)
2. Rear glass defogger switch
3. Rear glass defogger
...
 Rear Glass Defogger Switch Repair procedures
Inspection
1.
The body electrocal system can be quickly diagnosed failed parts
with vehicle diagnostic system(GDS).
The diagnostic system (GDS ...
Other information:
Hyundai Kona (OS) 2018-2026 Owners Manual: Prerequisite for activation
The FCA gets ready to be activated, when the FCA is selected on the LCD display,
and when the following prerequisites are satisfied.
- The ESC (Electronic Stability Control) is on. - Vehicle speed is over 10
km/h (6 mph). (The FCA is only activated within a certain speed range.) - The
system dete ...
Hyundai Kona (OS) 2018-2026 Service Manual: Gear Actuator Assembly Repair procedures
Removal
1.
Remove the air cleaner assembly and air duct.
(Refer to Engine Mechanical System - "Air Cleaner")
2.
Remove the battery and battery tray.
(Refer to Engine Electrical System - "Battery")
...
