Hyundai Kona: Roof Trim / Roof Trim Assembly Repair procedures
| Replacement |
|

|

| 1. |
Remove the front seat.
(Refer to Front Seat - "Front Seat Assembly")
|
| 2. |
Remove the rear seat.
(Refer to Rear Seat - "Rear Seat Assembly")
|
| 3. |
Remove the front pillar trim.
(Rear to Interior Trim - "Front Pillar Trim")
|
| 4. |
Remove the center pillar lower trim.
(Rear to Interior Trim - "Center Pillar Trim")
|
| 5. |
Remove the center pillar upper trim.
(Rear to Interior Trim - "Center Pillar Trim")
|
| 6. |
Remove the rear pillar trim.
(Rear to Interior Trim - "Rear Pillar Trim")
|
| 7. |
Remove the sunvisor and retainer.
(Rear to Roof Trim - "Sunvisor")
|
| 8. |
Remove the assist handle.
(Rear to Roof Trim - "Assist Handle")
|
| 9. |
Remove the overhead console lamp.
(Rear to Body Electrical System - "Overhead Console Lamp")
|
| 10. |
Remove the room lamp.
(Rear to Body Electrical System - "Room Lamp")
|
| 11. |
Remove the ECM mirror connector.
(Refer to Body Electrical System - "Electro Chromic Inside Rear View
Mirror")
|
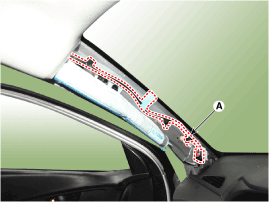
| 12. |
Disconnect the roof trim main connector (A) and the mounting clips in
the front pillar.
|
| 13. |
Disconnect the sunroof motor connector (A).
|

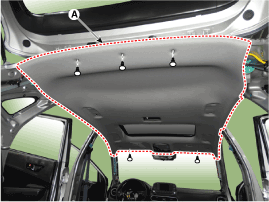
| 14. |
Remove the roof trim mounting clip and remove the roof trim assembly
(A).
|
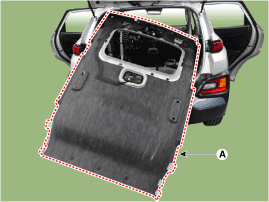
| 15. |
Carefully remove the liftgate weatherstrip.
|
| 16. |
Remove the roof trim assembly (A) from the vehicle through the liftgate.
|
| 17. |
Remove the vanity lamp.
(Refer to Body Electrical - "Vanity Lamp")
|
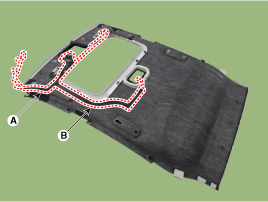
| 18. |
Remove roof trim wiring harness (A) from the roof trim (B).
|

| 19. |
To install, reverse removal procedure.
|
 Roof Trim Assembly Components and components location
Component Location
1. Roof Trim Assembly
...
 Interior Trim
...
Other information:
Hyundai Kona (OS) 2018-2026 Service Manual: Description and operation
Description
Idle Stop & Go (ISG) function automatically switches off the engine when the
car is at a standstill if the and starts it again as soon as the brake pedal
is released. This not only reduces fuel consumption, it also lowers emissions.
Idle Stop & Go (ISG) f ...
Hyundai Kona (OS) 2018-2026 Owners Manual: Parking brake
Checking the parking brake
Check the stroke of the parking brake by counting the number of “clicks’’ heard
while fully applying it from the released position. Also, the parking brake alone
should securely hold the vehicle on a fairly steep grade. If the stroke is more
or less than specifie ...
