Hyundai Kona: Controller / Heater & A/C Control Unit (Manual) Repair procedures
Hyundai Kona (OS) 2018-2026 Service Manual / Heating, Ventilation and Air Conditioning / Controller / Heater & A/C Control Unit (Manual) Repair procedures
| Replacement |
| 1. |
Disconnect the negative (-) battery terminal.
|
| 2. |
Remove the crash pad lower panel.
(Refer to Crash Pad - "Crash Pad Lower Panel")
|
| 3. |
Remove the crash pad garnish assembly [RH].
(Refer to Crash Pad - "Crash Pad Garnish Assembly [RH]")
|
| 4. |
Remove the console upper front garnish.
(Refer to Floor Console - "Floor Console Assembly")
|
| 5. |
Remove the glove box.
(Refer to Body - "Glove Box")
|
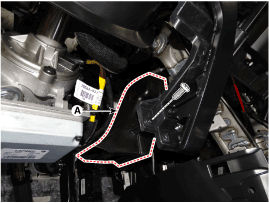
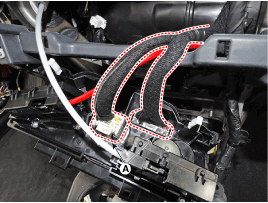
| 6. |
Remove the shower duct (A) after loosening the screw.
[LH]
[RH]
|
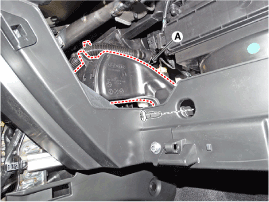
| 7. |
Disconnect the manual controller cable (A)
[LH]
[RH]
|

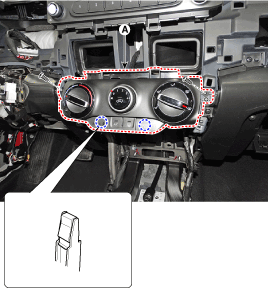
| 8. |
After loosening the mounting screws, remove the A/C & heater controller
unit (A).
|
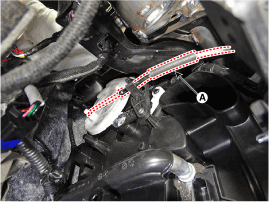
| 9. |
Disconnect the connector (A) and the air hose (B).
|
| 10. |
To install, reverse the removal procedure.
|

 Heater & A/C Control Unit (Manual) Components and components location
Components
Connector [A]
Pin NO
Function
Pin NO
Function
1
Low
...
 Heater & A/C Control Unit (DATC) Components and components location
Components
Connector [A]
Pin NO
Function
Pin NO
Function
1
Battery ...
Other information:
Hyundai Kona (OS) 2018-2026 Service Manual: Roof Side Molding Repair procedures
Replacement
•
Put on gloves to prevent hand injuries.
•
Wh ...
Hyundai Kona (OS) 2018-2026 Owners Manual: Folding the rear seat
The rear seatbacks can be folded to facilitate carrying long items or to increase
the luggage capacity of the vehicle.
WARNING
Never allow passengers to sit on top of the folded down seatback while
the vehicle is moving. This is not a proper seating position and no seat belts
are available fo ...
© 2018-2026 www.hkona.com
