Hyundai Kona: Liftgate / Liftgate Assembly Repair procedures
| âḃ |
Wear gloves to protect hands from injury.
|
|
| âḃ |
When removing and installing the liftgate, an assistant is needed.
|
|
| 1. |
Remove the liftgate trim.
(Refer to Liftgate - "Liftgate Trim")
|
| 2. |
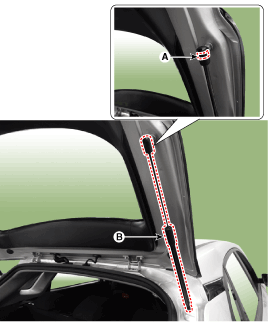
Using a screwdriver, lift the socket clips (A) up slightly on both ends
of the liftgate lifter (B).

|
| 3. |
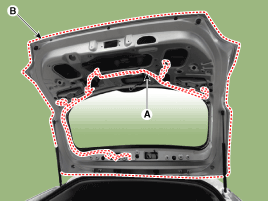
Disconnect the connectors and liftgate wiring harness (A).
|
| 4. |
After loosening the mounting bolts, then remove the liftgate assembly
(B).
|
Tightening torque :
21.6 - 26.5 N.m (2.2 - 2.7 kgf.m, 15.9 - 19.5 lb-ft)
|

|
| 5. |
To install, reverse removal procedure.
| âḃ
|
Make sure the liftgate locks / unlocks and opens / closes
properly.
|
| âḃ
|
Adjust the liftgate alignment.
|
| âḃ
|
Make sure the connectors are connected in properly.
|
| âḃ
|
Replace any damaged clips (or pin-type retainers).
|
|
|
Component Location
1. Liftgate assembly
...
Component Location
1. Liftgate trim
...
 Liftgate Assembly Components and components location
 Liftgate Trim Components and components location


