Hyundai Kona: Rear Seat / Rear Seat Latch Repair procedures
| Replacement |
| [LH] |
|
| 1. |
Remove the rear seat back cover [LH].
(Refer to Rear Seat - "Rear Seat Back Cover")
|
| 2. |
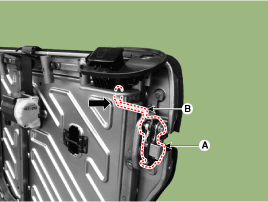
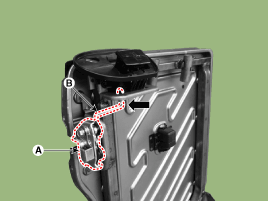
After loosening the mounting bolt, remove the rear seat latch (A).
|
| 3. |
Remove the rear seat latch rod (B) to direction of the arrow.
|
| 4. |
To install, reverse the removal procedure.
|
| [RH] |
|
| 5. |
Remove the rear seat back cover [RH].
(Refer to Rear Seat - "Rear Seat Back Cover")
|
| 6. |
After loosening the mounting bolt, remove the rear seat latch (A).
|
| 7. |
Remove the rear seat latch rod (B) to direction of the arrow.
|
| 8. |
To install, reverse the removal procedure.
|
 Rear Seat Latch Components and components location
Components Location
1. Reat seat latch [LH]
2. Reat seat latch [RH]
...
 Front Seat Belt
...
Other information:
Hyundai Kona (OS) 2018-2026 Owners Manual: Checking the tire inflation pressure
1. After driving approximately 7~10 km (4~6 miles or about 10 min), stop at a
safety location.
2. Connect the connection hose (9) of the compressor directly to the tire valve.
3. Plug the compressor power cord into the vehicle power outlet.
4. Adjust the tire inflation pressure to the recomended t ...
Hyundai Kona (OS) 2018-2026 Owners Manual: Detecting vehicles
The sensor may be limited when:
The radar sensor or camera is blocked with a foreign object or debris
The camera lens is contaminated due to tinted, filmed or coated windshield,
damaged glass, or stuck of foreign matter (sticker, bug, etc.) on the glass
Inclement weather such as heavy rain or ...


