Hyundai Kona: Brake System / Brake bleeding prcoedures
| Brake Bleeding Prcoedures |
|

| 1. |
Make sure the brake fluid in the reservoir is at the MAX (upper) level
line.
|
| 2. |
Have someone slowly pump the brake pedal several times, and then apply
pressure.
|
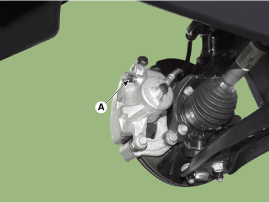
| 3. |
Loosen the right-rear brake bleed screw (A) to allow air to escape from
the system. Then tighten the bleed screw securely.
[Front]
[Rear]
|
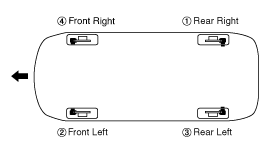
| 4. |
Repeat the procedure for wheel in the sequence shown below until air
bubbles no longer appear in the fluid.
|
| 5. |
Refill the master cylinder reservoir to MAX (upper) level line.
|
| 1. |
Remove the reservoir cap and fill the brake reservoir tank with brake
fluid.
|
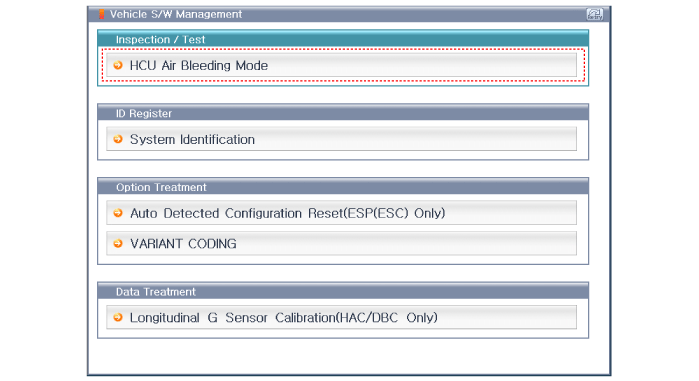
| 2. |
Connect self-diagnosis connector (16pins) located under the driver side
crash pad to self-diagnosis device, and then turn the self-diagnosis
device after key is ON.
|
| 3. |
Select the "vehicle model" and "ABS/ESC" on GDS vehicle selection screen,
then select OK.
|
| 4. |
Select HCU air bleeding mode.
|
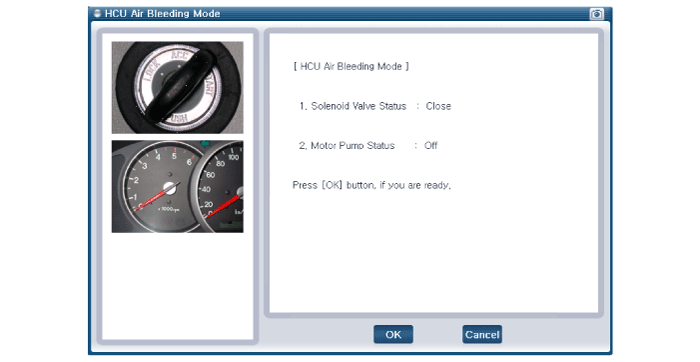
| 5. |
Have an assistant press the brake pedal several times to pressurize
it and keep it pressed.
|
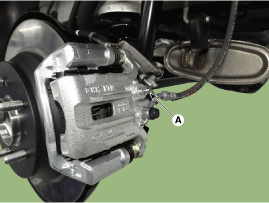
| 6. |
Pump the brake pedal several times, and then loosen the bleeder screw
until fluid starts to run out without bubbles. Then close the bleeder
screw (A).
[Front]
[Rear]
|
| 7. |
Repeat the procedure for wheel in the sequence shown below until air
bubbles no longer appear in the fluid.
|
| 8. |
The steps should be performed in the order of rear right, front left,
rear left and front right.
|
| 9. |
Refill the master cylinder reservoir to MAX (upper) level line.
|
 Troubleshooting
Troubleshooting
Problem Symptoms Table
Use the table below to help you find the cause of the problem. The numbers indicate
the priority of the like cause of the problem ...
 Brake System
...
Other information:
Hyundai Kona (OS) 2018-2026 Owners Manual: Electric power steering (EPS)
The system assists you with steering the vehicle. If the engine is off or if
the power steering system becomes inoperative, the vehicle may still be steered,
but it will require increased steering effort.
Also, the steering effort becomes heavier as the vehicle’s speed increases and
becomes lig ...
Hyundai Kona (OS) 2018-2026 Service Manual: Auto Defogging Sensor Repair procedures
Diagnosis With GDS
1.
The heating, ventilation and air conditioning can be quickly diagnosed
failed parts with vehicle diagnostic system (GDS).
※ The diagnostic system (GDS) provides the following information.
(1) Self d ...
