Hyundai Kona: Forward Collision-Avoidance Assist (FCA) System / Repair procedures
| – |
The ON/OFF for FCA is included in the USM (User Setting Menu) and the
default is ON.
|
| – |
While IGN is On, it stays at ON, however, the driver's settings do not
last next time when IGN is newly On.
|
| – |
When VDC is OFF, FCA is also turned OFF.
|
[FCA Radar]
| 1. |
Remove the front bumper cover.
(Refer to Body - "Front Bumper Cover")
|
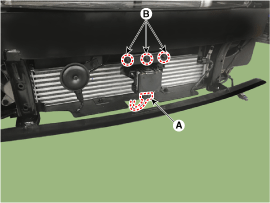
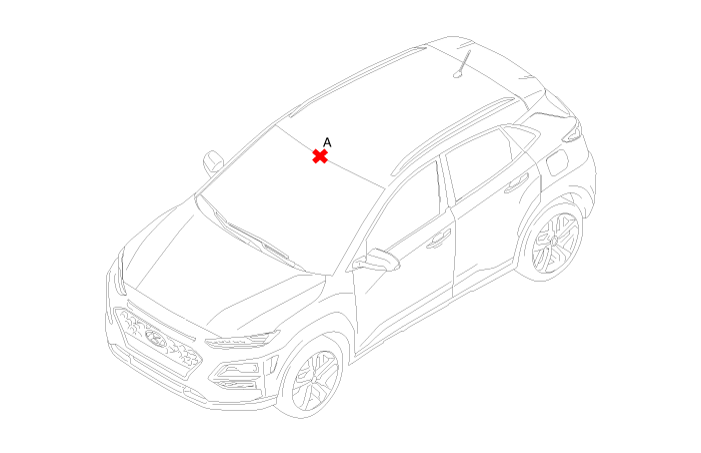
| 2. |
Remove the FCA rader (A).
|
| 3. |
Loosen the bolts (B) and then removing the FCA unit assembly from the
veicle.
|
[FCA Radar]
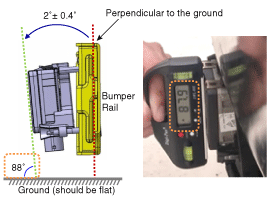
| 1. |
To install, reverse the removal procedure.
| •
|
The vertical installation angle of the unit must be
within 2°± 0.4°. (not 0 degree)
※ Before installing the bumper onto the vehicle, measure
the vertical angle of the unit with a protractor as
shown.
|
|
|
| 2. |
Perform the FCA radar alignment.
|
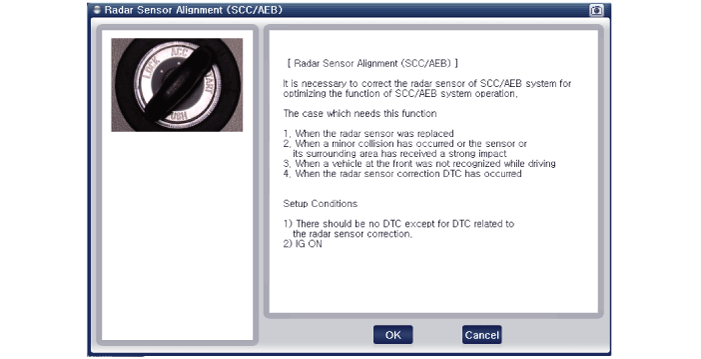
[(FCA) Radar Sensor Alignment]
FCA system is designed to help avoid a potential collision or reduce its impact
when drivers applies inadequate, delayed or no brakes at all to avoid a collision.
In order for the radar sensor to operate correctly, it must be properly aligned
parallel to the driving direction of the vehicle.For this reason, the radar
sensor alignment procedure must be carried out whenever the sensor has been
reinstalled or replaced with a new one.
If the sensor alignment procedure is not performed in the conditions mentioned
above, the smart cruise control system may not operate correctly.
|
The FCA radar sensor alignment is required when :
| • |
The FCA unit has been reinstalled or replaced with a new one.
|
| • |
The radar sensor or the surrounding parts have been impacted
by collision.
|
| • |
The sensor cannot detect a vehicle in front.
|
| • |
The Steering Angle Sensor (SAS) has been replaced or adjusted.
|
|
|
If the sensor cannot detect the vehicle in front :
| • |
Park the vehicle on a level ground.
|
| • |
Set all tires according to the specified pressure.
|
| • |
Check wheel alignment.
|
| • |
Check that the front surface of the FCA unit is clean.
|
|
[Radar Sensor Alignment]
| • |
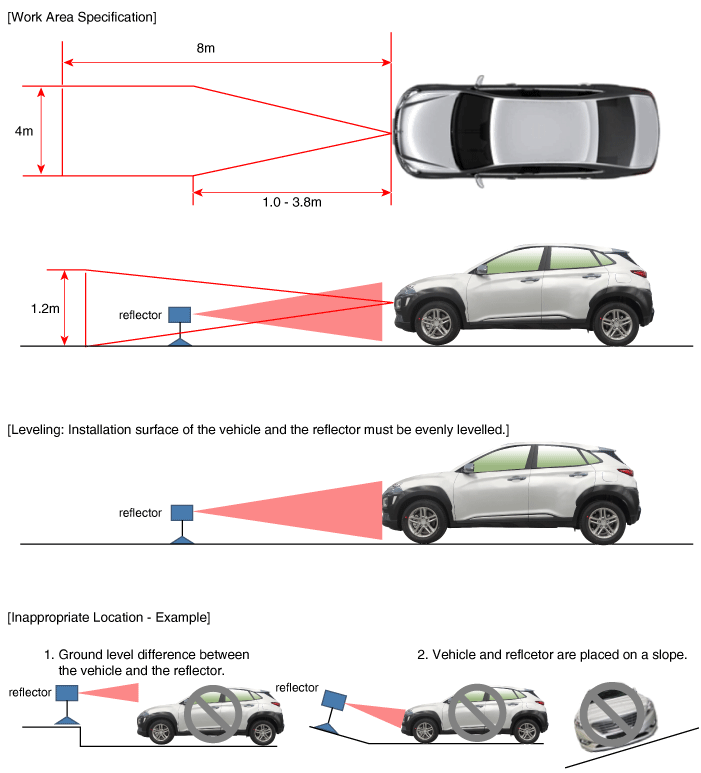
Adjustment may not be accurate if the vehicle and reflector
are placed on different ground levels or on a slope.
|
| • |
Perform in an area with minimum clearance of 8 m to the front,
4 m wide, and 1.2 m above the ground.
|
| • |
Remove heavy objects from inside of the vehicle (seating area
and trunk).
|
| • |
Ensure that all tires are filled with specified air pressure.
|
| • |
Remove objects (metal plates, resins, etc.) that may cause electric
signal interference from the area where sensor alignment is
performed.
|
| • |
Be sure that the vehicle is not moved and free from vibration
when performing sensor alignment (getting in/out or opening/closing
doors).
|
| • |
Check that radiator grille and sensor cover are not dirty.
|
| • |
Check for correct wheel alignment.
|
| • |
Do not turn OFF the power when performing sensor alignment.
|
| • |
Power supplied to the radar sensor must be between 9V - 16V.
|
| • |
Temperature in the area where sensor alignment is performed
must be between -30 - 60°C.
|
|
| 1. |
Park the vehicle on a level ground.
|
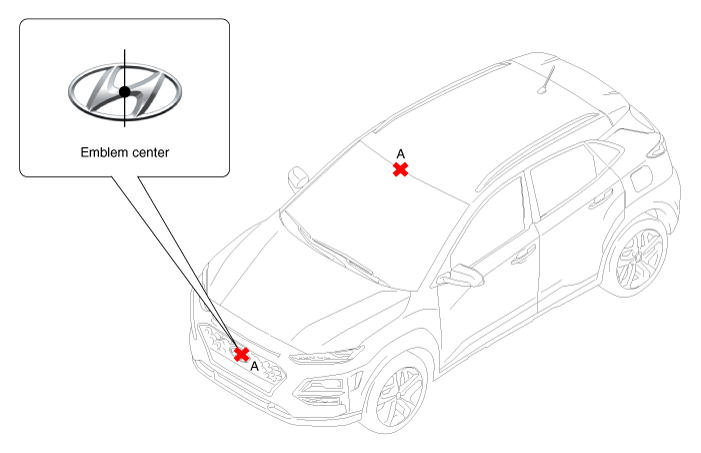
| 2. |
Mark the center point on top of wind glass (A).
|
| 3. |
Mark the center point of emblem (A).
|
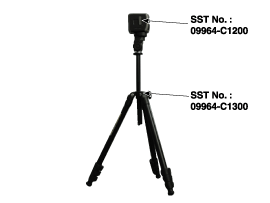
| 4. |
Mount the FCA Calibration Laser [SST No. : 09964-C1200] onto the tripod
[SST No. : 09964-C1300].
|
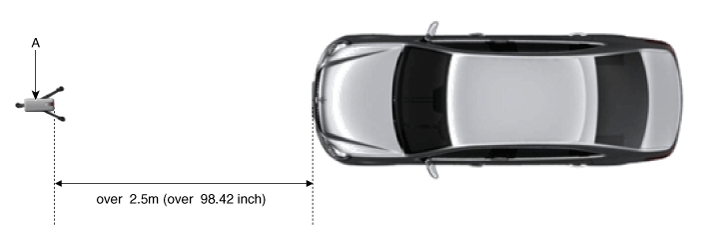
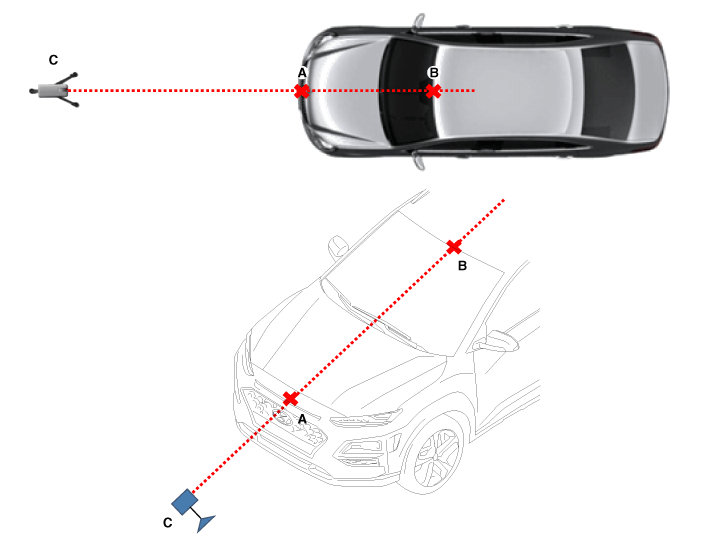
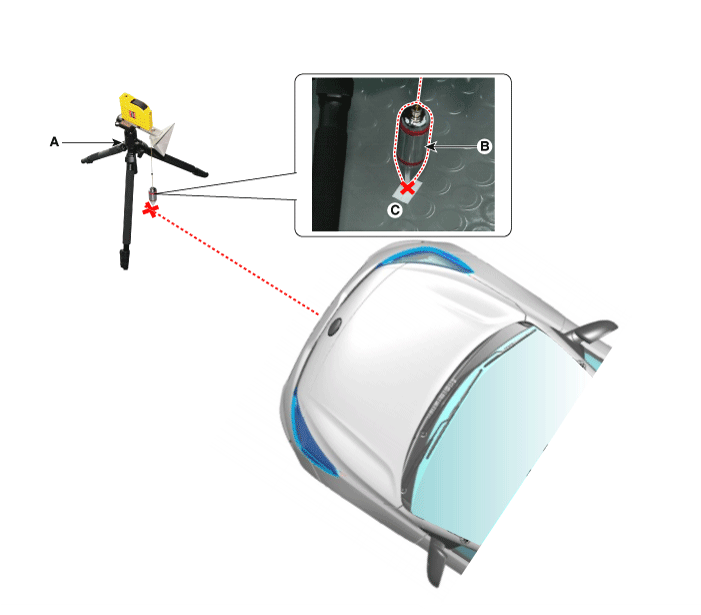
| 5. |
Install the vertical/horizontal laser [SST No. : 09964-C1200] (A) at
least 2.5 m to the front of the vehicle.
|
| 6. |
Match the vertical line of laser to (A) and (B) using the vertical/horizontal
laser (C) [SST No. : 09964-C1200].
|
| 7. |
Mark (C) at 2.3 - 2.5m (90.55 - 98.42 inch) from (A) in front of the
vehicle.
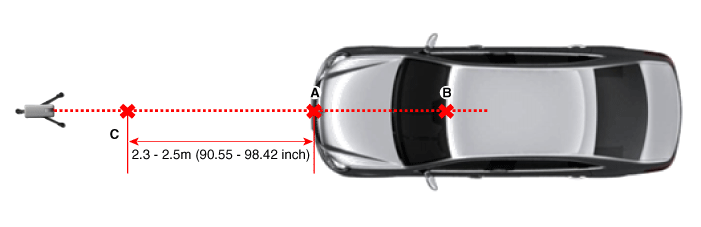
| •
|
If possible, perform calibration at the 2.5m position.
|
|
|
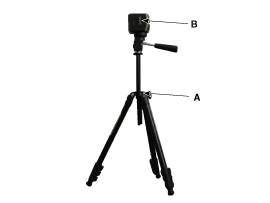
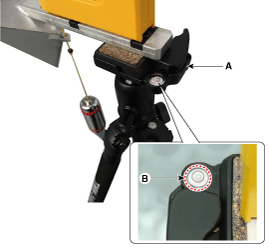
| 8. |
Remove the FCA Calibration Laser [SST No. : 09964-C1200] (B) from the
tripod [SST No. : 09964-C1300] (A).
|
| 9. |
Mount the reflector [SST No. : 09964-C1100] (B) onto the tripod [SST
No. : 09964-C1300] (A).
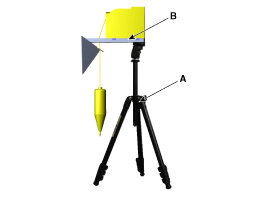
|
| 10. |
Align the vertical weight (B) of the FCA Calibration Reflector [SST
No. : 09964-C1100] (A) with the point (C).
|
| 11. |
Using the bubble level (B) of the tripod [SST No. : 09964-C1300] (A),
set the reflector horizontally.
|
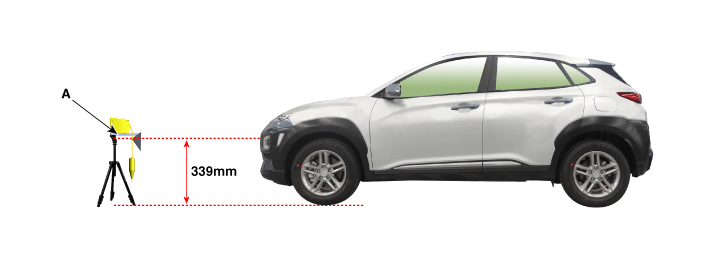
| 12. |
Set the height of the FCA calibration reflector [SST No. : 09964-C1100]
(A) to 339mm (13.35inch).
|
| 13. |
Visually check again the radar sensor and the surface of the front bumper
for the following.
| •
|
Make sure that there is no debris, or reflecting object
on the surface of the radar.
|
| •
|
Make sure that there is no debris, or reflecting object
on the radiator grille.
|
|
|
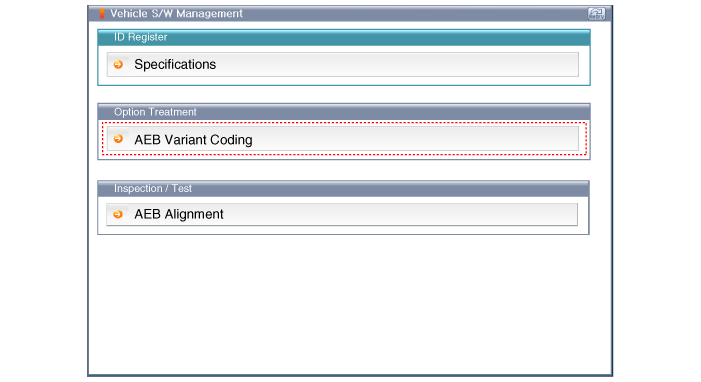
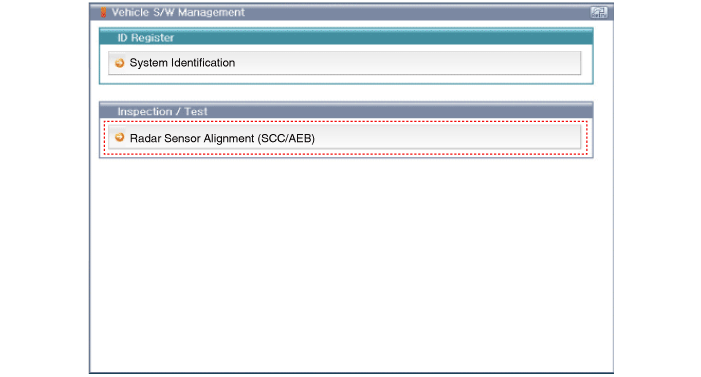
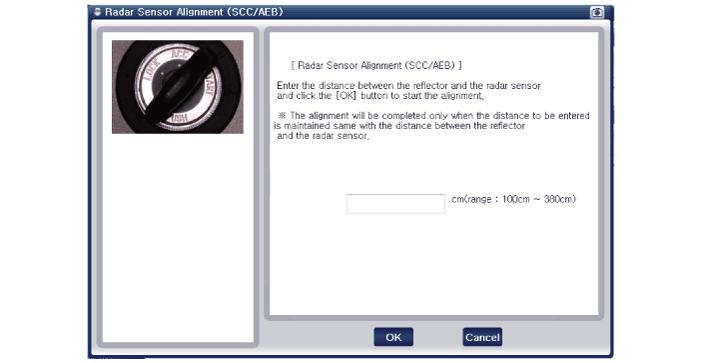
| 14. |
Connect the KDS/GDS to the DLC of the vehicle and start sensor alignment.
| •
|
If the engine is running, the vibration may cause inaccurate
sensor alignment, so perform sensor alignment in IG
ON mode.
|
|
|
| 15. |
After correctly selecting the vehicle model, select "FCA Alignment"
from the auxiliary functions in KDS/GDS Menu.
|
| 16. |
Perform sensor alignment as indicated on the KDS/GDS monitor.
|
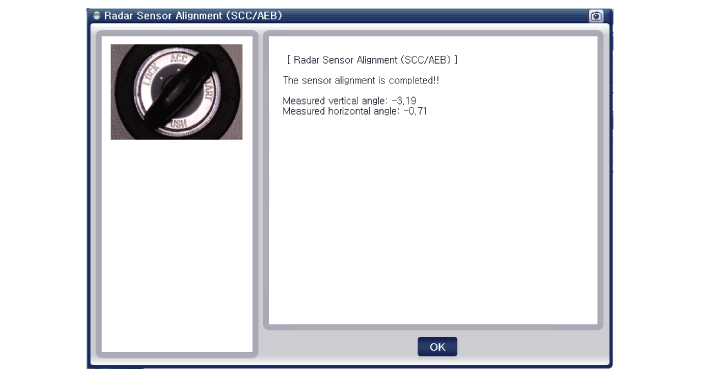
| 17. |
In case of sensor alignment failure, check the alignment conditions.
Turn the ignition key OFF, then reperform the sensor alignment procedure.
|
Schematic Diagram
Terminal Function
No
Function
1
-
2
C-CAN Low
...
Other information:
Hyundai Kona (OS) 2018-2026 Owners Manual: To turn Cruise Control off
Press the (CRUISE) button (the (CRUISE) indicator light will go off).
Press the button (The cruise indicator light will go off.). (if equipped
with Speed Limit Control) - With the Cruise Control on, pressing the button
once will turn Off the Cruise Control and turn on the Speed Limit Control ...
Hyundai Kona (OS) 2018-2026 Owners Manual: Noise and smoke from inflating air bag
When the air bags inflate, they make a loud noise and may produce smoke and powder
in the air inside of the vehicle. This is normal and is a result of the ignition
of the air bag inflator. After the air bag inflates, you may feel substantial discomfort
in breathing because of the contact of your ...

 Schematic diagrams
