Hyundai Kona: Fender / Repair procedures
Hyundai Kona (OS) 2018-2026 Service Manual / Body (Interior and Exterior) / Fender / Repair procedures
| Replacement |
|

|

| 1. |
Remove the front bumper.
(Refer to Front Bumper - "Front Bumper Cover")
|
| 2. |
Remove the head lamps.
(Refer to Body Electrical System - "Head Lamps")
|
| 3. |
Remove the front wheel guard.
(Refer to Body Side Molding - "Front Wheel Guard")
|
| 4. |
Remove the fender garnish.
(Refer to Body Side Molding - "Fender Garnish.")
|
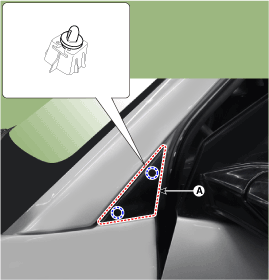
| 5. |
Using a screwdriver or remover, remove the delta garnish (A).
|
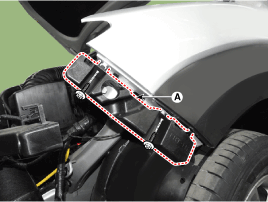
| 6. |
Remove the front bumper side mounthing bracket (A) after loosening the
bolts.
|
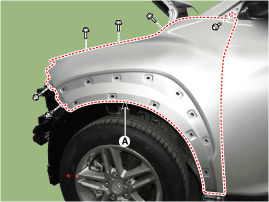
| 7. |
After loosening the mounting bolts remove the fender assembly (A).
|
| 8. |
To install, reverse removal procedure.
|
 Components and components location
Component Location
1. Fender assembly
...
 Hood
Hood
...
Other information:
Hyundai Kona (OS) 2018-2026 Service Manual: Alternator Repair procedures
Removal
1.
Turn ignition switch OFF and disconnect the battery negative (-) terminal.
2.
Disconnect the air compressor connector (A) and the alternator connector
(B), and remove the cable (C) from alternator "B" terminal.
...
Hyundai Kona (OS) 2018-2026 Service Manual: Power Seat Motor Components and components location
Component Location
1. Lumber support motor (Horizontal)
2. Rear height motor
3. Reclining motor
4. Slide motor
5. Front height motor
6. Reclining limit switch
7. Lumber support switch
8. Seat switch
...
© 2018-2026 www.hkona.com
