Hyundai Kona: Trunk Trim / Repair procedures
Hyundai Kona (OS) 2018-2026 Service Manual / Body (Interior and Exterior) / Trunk Trim / Repair procedures
| Replacement |
|
|
| 1. |
Remove the rear seat assembly
(Refer to Rear Seat - "Rear Seat Assembly")
|
| 2. |
Carefully remove the rear door body side weatherstrip.
|
| 3. |
Carefully remove the tail gate weatherstrip.
|
| 4. |
Remove the rear door scuff trim.
(Refer to Interior Trim - "Door Scuff Trim")
|
| 5. |
Remove the rear transverse trim.
(Refer to Interior Trim - "Rear Transverse Trim")
|
| 6. |
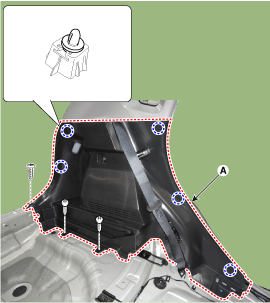
After loosening the mounting bolts and clip, remove the luggage side
trim (A).
|
| 7. |
To install, reverse removal procedure.
|
 Components and components location
Components
1. Luggage side trim [LH]
2. Luggage side trim [RH]
3. Rear transverse trim
4. Covering shelf trim assembly
5. Luggage bord assembly
6. Lugga ...
 Windshield Glass
...
Other information:
Hyundai Kona (OS) 2018-2026 Owners Manual: Driving at night
Night driving presents more hazards than driving in the daylight. Here are some
important tips to remember:
Slow down and keep more distance between you and other vehicles, as it
may be more difficult to see at night, especially in areas where there may not
be any street lights.
Adjust your ...
Hyundai Kona (OS) 2018-2026 Service Manual: Components and components location
Component Location
1. Power door mirror
2. Power door mirror switch
3. Power folding mirror switch
...
© 2018-2026 www.hkona.com


