Hyundai Kona: Quarter Fixed Glass / Repair procedures
Hyundai Kona (OS) 2018-2026 Service Manual / Body (Interior and Exterior) / Quarter Fixed Glass / Repair procedures
| Replacement |
[Removal]
|

|

| 1. |
Remove the rear pillar trim.
(Refer to Interior Trim - "Rear Pillar Trim")
|
| 2. |
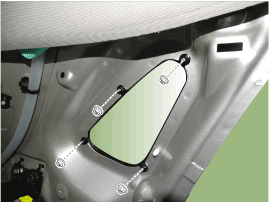
Loosen the quarter fixed glass mounting nuts.
|
| 3. |
Cut out the quarter fixed glass sealant using the utility knife.
|

| 4. |
Remove the quarter fixed glass (A).
|
[Installtion]
| 1. |
With a putt knife, scrape the old adhesive smooth to a thickness of
about 2mm (0.08 in.) on the bonding surface around the entire quarter
fixed glass flange.
|
| 2. |
Clean the body bonding surface with a sponge dampened in alcohol. After
cleaning, keep the surface away from oil, grease and water.
|
| 3. |
With a sponge, apply a light coat of glass primer along the edge of
the quarter fixed glass, and then lightly wipe it off with a gauze or
cheese cloth.
|
| 4. |
With a sponge, apply a light coat of body primer to the original adhesive
remaining around the flange. Let the body primer dry for at least 10
minutes.
|
| 5. |
Load adhesive into the cartridge without air pockets to ensure continuous
delivery. Put the cartridge in a caulking gun, and run a bead of sealant
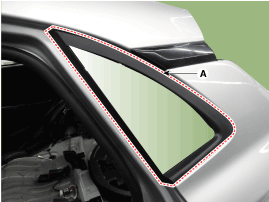
around the edge of the quarter fixed glass (A) as shown. Apply the adhesive
within 30 minutes after loading.
|
| 6. |
Install the quarter fixed glass.
|
| 7. |
Let the adhesive dry for at least one hour, then spray water over the
quarter fixed glass to check for leaks. Mark the leaking areas, let
the quarter fixed glass dry, then seal with sealant. Let the vehicle
stand for at least four hours after sealing.
|
| 8. |
Reinstall all remaining removed parts.
|
| 9. |
Install the rear pillar trim.
(Refer to Interior Trim - "Rear Pillar Trim")
|
 Components and components location
Components
1. Quarter fixed glass
...
 Floor Carpet
...
Other information:
Hyundai Kona (OS) 2018-2026 Service Manual: Schematic diagrams
Schematic Diagrams
[MDPS]
Terminal function
Type
Pin No
Description
Battery
1
Battery +
2
Battery -
Vehicle speed
1
...
Hyundai Kona (OS) 2018-2026 Service Manual: Pressure Sensor Repair procedures
Inspection
•
If you have trouble code related to the pressure sensor check
pressure sensor according to the inspection process.
Pressure Sensor Inspec ...
© 2018-2026 www.hkona.com
