Hyundai Kona: Fuel Delivery System / Repair procedures
Hyundai Kona (OS) 2018-2026 Service Manual / Engine Control / Fuel System / Fuel Delivery System / Repair procedures
| Fuel Pressure Test |
| 1. |
Release the residual pressure in fuel line (Refer to "Release Residual
Pressure in Fuel Line" in this group).
|

| 2. |
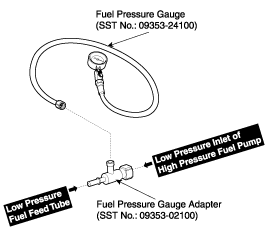
Install the Special Service Tool (SST).
|
| 3. |
Inspect fuel leakage on connections among the fuel feed tube, the delivery
pipe, and the SST components with IG ON.
|
| 4. |
Measure Fuel Pressure
|

| 5. |
Release the residual pressure in fuel line.
(Refer to Fuel Delivery System - "Release Residual Pressure in Fuel
Line")
|
| 6. |
Test End
|
| Release Residual Pressure in Fuel Line |
|
| 1. |
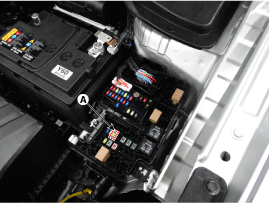
Turn the ignition switch OFF and disconnect the battery (-) cable.
|
| 2. |
Remove the fuel pump fuse (A).
|
| 3. |
Connect the battery (-) cable.
|
| 4. |
Start the engine and let idle, and then turn the ignition switch OFF
after the engine has stopped on its own.
|
| 5. |
Disconnect the battery (-) cable, and then install the fuel pump relay
(A).
|
| 6. |
Connect the battery (-) cable.
|
| 7. |
Delete the Diagnostic Trouble Code (DTC) related the fuel pump relay
with the GDS.
|
 Components and components location
Component Location
[Fuel Tank]
1. Fuel tank
2. Fuel pump
3. Fuel filter
4. Fuel pressure regulator
5. Canister
6. Fuel tank air filter
...
 Fuel Tank Repair procedures
Removal
1.
Release the residual pressure in fuel line.
(Refer to Fuel Delivery System - "Release Residual Pressure in Fuel
Line")
...
Other information:
Hyundai Kona (OS) 2018-2026 Service Manual: Special service tools
Special Service Tools
Tool (Number and Name)
Illustration
Application
Fuel Pressure Gauge
(09353-24100)
Measuring the fuel line pressure
Fuel Pressure Gauge Adapter
(09353-02100)
...
Hyundai Kona (OS) 2018-2026 Service Manual: Description and operation
Description
The starting system includes the battery, starter, solenoid switch, ignition
switch, inhibitor switch (A/T), clutch pedal switch (M/T), ignition lock switch,
connection wires and the battery cable.
When the ignition key is turned to the start position, current f ...
© 2018-2026 www.hkona.com
