Hyundai Kona: Fuel Delivery System / Fuel Tank Repair procedures
| Removal |
| 1. |
Release the residual pressure in fuel line.
(Refer to Fuel Delivery System - "Release Residual Pressure in Fuel
Line")
|
| 2. |
Remove the rear seat cushion.
(Refer to Body - "Rear Seat Assembly")
|
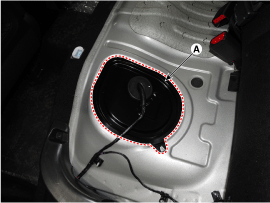
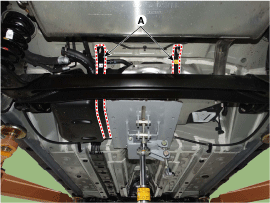
| 3. |
Remove the fuel pump service cover (A).
|
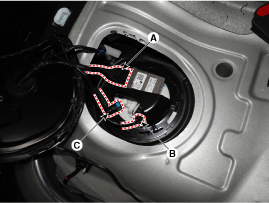
| 4. |
Disconnect the fuel pump control module connector (A).
|
| 5. |
Disconnect the fuel pressure sensor connector (B).
|
| 6. |
Disconnect the fuel feed tube quick-connector (C).
|
| 7. |
Lift the vehicle.
|
| 8. |
Remove the center muffler assembly.
(Engine Mechanical System - "Muffler")
|
| 9. |
Remove the Propeller Shaft Assembly. [With 4WD vehicle]
(Refer to Driveshaft and axle - "Propeller Shaft")
|
| 10. |
Remove the canister assembly.
(Refer to Emission Control System - "Canister")
|
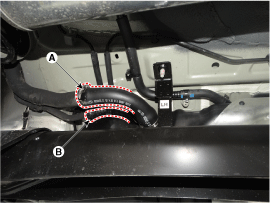
| 11. |
Disconnect the fuel filler hose (A).
|
| 12. |
Disconnect the ventilation tube (B).
|
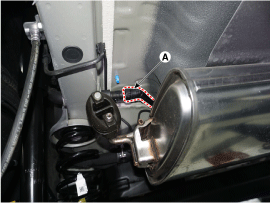
| 13. |
Disconnect the leveling hose quick connector (C).
|
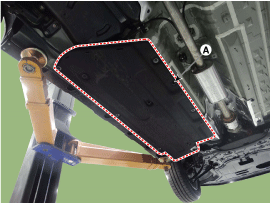
| 14. |
Remove the side under cover (A).
|
| 15. |
Support the fuel tank with a jack.
|
| 16. |
Remove the fuel tank from the vehicle after removing the fuel tank band
nuts (A).
|

| Installation |
| 1. |
Install in the reverse order of removal.
|
 Repair procedures
Fuel Pressure Test
1.
Release the residual pressure in fuel line (Refer to "Release Residual
Pressure in Fuel Line" in this group).
...
 Fuel Pump Repair procedures
Inspection
1.
Turn the ignition switch OFF, and then remove battery (-) terminal.
2.
Remove the fuel pump assembly.
3. ...
Other information:
Hyundai Kona (OS) 2018-2026 Owners Manual: Automatic heating and air conditioning
The Automatic Climate Control System is controlled by setting the desired temperature.
1. Press the AUTO button. (3)
The modes, fan speeds, air intake and air-conditioning will be controlled automatically
by the temperature setting you select.
2. Turn the temperature control knob (1) to the desired ...
Hyundai Kona (OS) 2018-2026 Service Manual: Fuel Filler Cap Description and operation
Description
A ratchet tightening device on the threaded fuel filler cap reduces the chances
of incorrect installation, which would seal the fuel filler. After the gasket
on the fuel filler cap and the filler neck flange contact each other, the ratchet
produces a loud clickin ...
