Hyundai Kona: Dual Clutch Transmission Control System / Shift Cable Repair procedures
| Removal |
| 1. |
Place the shift lever in the "N" position
|
| 2. |
Remove the air cleaner assembly and air duct.
(Refer to Engine Mechanical System - "Air Cleaner")
|
| 3. |
Remove the battery and tray.
(Refer to Engine Electical System - "Battery" )
|
| 4. |
Remove the ECM.
(Refer to Engine Control System - "ECM")
|
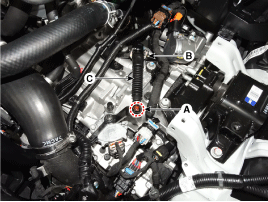
| 5. |
Remove the shift cable (C) from the cable bracket (B), after loosening
the shift cable nut (A).
|
| 6. |
Remove the floor console assembly.
(Refer to Body - "Floor Console")
|
| 7. |
Remove the crash pad.
(Refer to Body - "Crash Pad")
|
| 8. |
Remove the heater and blower.
(Refer to Heating, Ventilation and Air Conditioning - "Heater")
|
| 9. |
Disconnect the shift cable.
|
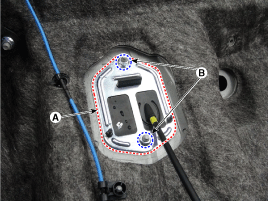
| 10. |
Remove the retainer (A) by loosening the nuts (B-2ea).
|
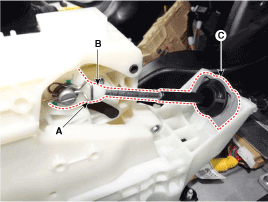
| 11. |
Remove the shift cable from the vehicle.
|
| Installation |
| 1. |
Install the retainer (A) and then tighten the nut (B-2ea).
|
| 2. |
Install the shift cable (A) and then fix the snap pin (B).
|
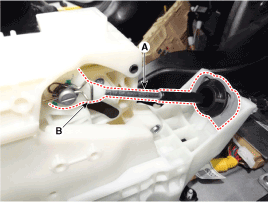


| 3. |
Install the shift cable (A) in the cable bracket (B).
|
| 4. |
Align the hole (C) in the manual control lever with the "N" position
hole (D) of the inhibitor switch and then insert the inhibitor switch
guide pin (SST No.:09480-A3800).
|
| 5. |
Lightly tighten the nut (E) after connected the shift cable (B) in the
manual control lever.
|
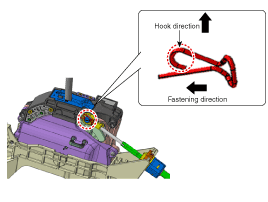
| 6. |
Push shift cable (B) lightly to "F" direction shown to eliminate free
play of shift cable.
|
| 7. |
Tighten the nut (E) with the specified torque.
|
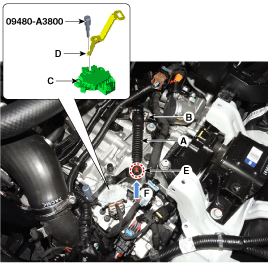
| 8. |
Remove the inhibitor switch guide pin (SST No.:09480-A3800) from the
hole.
|
| 9. |
Install the battery and tray.
(Refer to Engine Electrical System - "Battery")
|
| 10. |
Install the ECM.
(Refer to Engine Control System - "ECM")
|
| 11. |
Install the air cleaner assembly and air duct.
(Refer to Engine Mechanical System - "Air cleaner")
|
 Shift Cable Components and components location
Components
1. Shift
knob & boots assembly
2. Shift lever assembly
3. Shift cable
4. Manual
control lever
5. Shift cable retainer
...

Other information:
Hyundai Kona (OS) 2018-2026 Service Manual: Radiator Repair procedures
Removal and Installation
1.
Loosen the drain plug, and drain the coolant and remove the radiator
cap to speed draning.
(Refer to Cooling System - "Coolant")
2.
Remove the cooling fan.
(Refer to Cooling Syste ...
Hyundai Kona (OS) 2018-2026 Owners Manual: Icy road warning light
This warning light is to warn the driver the road may be icy.
When the temperature on the outside temperature gauge is approximately below
4┬░C (40┬░F), the Icy Road Warning Light and Outside Temperature Gauge blinks 10 times,
and then illuminates. Also, the warning chime sounds 3 times.
Informat ...
