Hyundai Kona: Air Conditioning System / Condenser Repair procedures
Hyundai Kona (OS) 2018-2026 Service Manual / Heating, Ventilation and Air Conditioning / Air Conditioning System / Condenser Repair procedures
| Inspection |
| 1. |
Check the condenser fins for clogging and damage. If clogged, clean
them with water, and blow them with compressed air. If bent, gently
bend them using a screwdriver or pliers.
|
| 2. |
Check the condenser connections for leakage, and repair or replace
it, if required.
|
| Replacement |
| 1. |
Recover the refrigerant with a recovery / recycling / charging station.
|
| 2. |
Disconnect the negative (-) battery terminal.
|
| 3. |
Remove the front bumper.
(Refer to Body - "Front Bumper Cover")
|
| 4. |
Remove the radiator upper mounting bracket.
(Refer to Enging Mechanical System - "Radiator")
|
| 5. |
After loosening the mounting bolts and clips, remove the radiator
air guard (A).
|
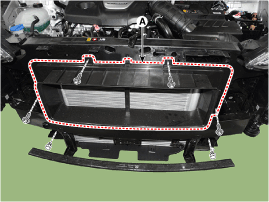
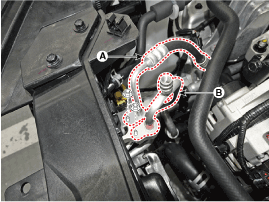
| 6. |
Remove the 2 nuts, and then disconnect the discharge line (A) and
liquid line (B) from the condenser.
|
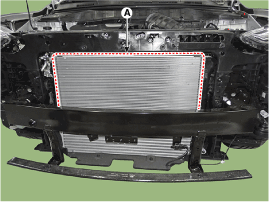
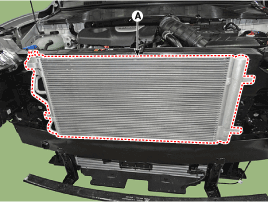
| 7. |
Remove the condenser (A) from radiator.
|
| 8. |
To install, reverse the removal procedure.
|

 Condenser Components and components location
Components Location
1. Condenser
...
 Receiver-Drier Repair procedures
Replacement
1.
Remove the condenser.
2.
Remove the cap (A) on the bottom of the condenser with a L wrench.
...
Other information:
Hyundai Kona (OS) 2018-2026 Owners Manual: Downhill Brake Control (DBC)
The Downhill Brake Control (DBC) supports the driver come down a steep hill without
depressing the brake pedal.
It slows down the vehicle under 8 km/h (5 mph) (for dual clutch transmission
vehicles) or 8 km/h (5 mph) (for manual transaxle vehicles) and lets the driver
concentrate on steering the ...
Hyundai Kona (OS) 2018-2026 Service Manual: Front Wheel Speed Sensor Components and components location
Components
1. Front wheel speed sensor
2. Front wheel speed sensor connector
...
© 2018-2026 www.hkona.com
