Hyundai Kona: Engine Control System / CVVT Oil Control Valve (OCV) Repair procedures
Hyundai Kona (OS) 2018-2026 Service Manual / Engine Control / Fuel System / Engine Control System / CVVT Oil Control Valve (OCV) Repair procedures
| Inspection |
| 1. |
Turn the ignition switch OFF.
|
| 2. |
Disconnect the OCV connector.
|
| 3. |
Measure resistance between the OCV terminals 1 and 2.
|
| 4. |
Check that the resistance is within the specification.
|
| Removal |
| 1. |
Turn the ignition switch OFF and disconnect the battery negative (-)
cable.
|
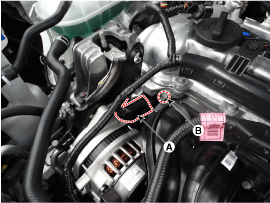
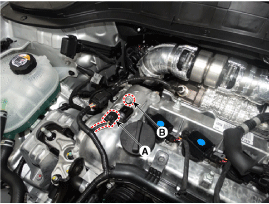
| 2. |
Disconnect the CVVT oil control valve connector (A).
|
| 3. |
Remove the installation bolt (B), and then remove the valve from the
engine.
[Bank 1 / Intake]
[Bank 1 / Exhaust]
|
| Installation |
|

|
| 1. |
Install in the reverse order of removal.
|
 CVVT Oil Control Valve (OCV) Schematic diagrams
Circuit Diagram
Harness Connector
OCV [Bank 1/Intake]
OCV [Bank 1/Exhaust]
...
 Electric WGT Control Actuator Description and operation
Desrcription
The Electric WGT Control Actuator is installed on the turbocharger. It operates
the vain in the Waste Gate Turbocharger (WGT) and regulates the compressed air
amount ...
Other information:
Hyundai Kona (OS) 2018-2026 Owners Manual: Detecting vehicles
The sensor may be limited when:
The radar sensor or camera is blocked with a foreign object or debris
The camera lens is contaminated due to tinted, filmed or coated windshield,
damaged glass, or stuck of foreign matter (sticker, bug, etc.) on the glass
Inclement weather such as heavy rain or ...
Hyundai Kona (OS) 2018-2026 Service Manual: Front Stabilizer Bar Repair procedures
Removal
1.
Loosen the wheel nuts slightly.
Raise the vehicle, and make sure it is securely supported.
2.
Remove the front wheel and tire (A) from the front hub.
Tightening torque :
107.9 - 12 ...
© 2018-2026 www.hkona.com
