Hyundai Kona: Crash Pad / Main Crash Pad Assembly Repair procedures
Hyundai Kona (OS) 2018-2026 Service Manual / Body (Interior and Exterior) / Crash Pad / Main Crash Pad Assembly Repair procedures
| Replacement |
|

|

| 1. |
Remove the front pillar trim.
(Refer to Interior Trim - "Front Pillar Trim")
|
| 2. |
Remove the floor console assembly.
(Refer to Floor Console - "Floor Console Assembly")
|
| 3. |
Remove the crash pad lower panel.
(Refer to Crash Pad - "Crash Pad Lower Panel")
|
| 4. |
Remove the cluster fascia panel.
(Refer to Cluster Pad - "Center Fascia Panel")
|
| 5. |
Remove the crash pad garnish assembly [RH].
(Refer to Crash Pad - "Crash pad side garnish assembly [RH]")
|
| 6. |
Remove the heater & A/C control unit .
(Refer to Heating,Ventilation, Air Conditioning - "Heater & A/C Control
Unit (MANUAL)")
(Refer to Heating,Ventilation, Air Conditioning - "Heater & A/C Control
Unit (DATC)")
|
| 7. |
Remove the glove box upper cover assembly.
(Refer to Crash Pad - "Glove Box Upper cover assembly")
|
| 8. |
Remove the steering wheel.
(Refer to Steering System - "Steering Wheel")
|
| 9. |
Remove the steering column shroud lower panel.
(Refer to Crash Pad - "Steering Column Shroud Panel")
|
| 10. |
Remove the multifunction switch assembly.
(Refer to Body Electrical System - "Multifunction Switch")
|
| 11. |
Remove the instrument cluster.
(Refer to Body Electrical System - "Instrument Cluster")
|
| 12. |
Remove the audio and AVN head unit.
(Refer to Body Electrical System - "Audio Unit")
|
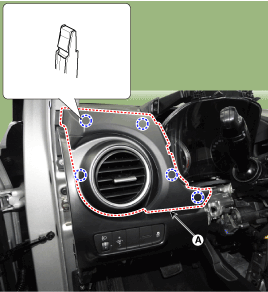
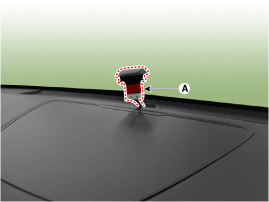
| 13. |
Using a remover, remove the side airvent duct assembly [LH] (A).
|
| 14. |
After loosening the mounting screws, remove the crash pad garnish asse
[LH] (A).
|
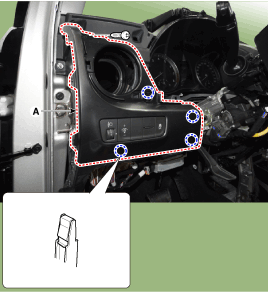
| 15. |
Disconnect the connector (A).
|
| 16. |
After loosening the mounting screws, remove the crash pad center panel
assembly (A).
|
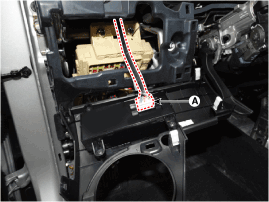
| 17. |
Disconnect the security lamp connector (A).
|
| 18. |
Loosen the mounting nuts (A).
|
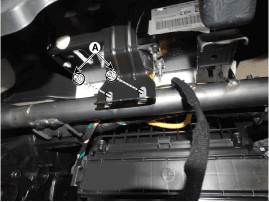
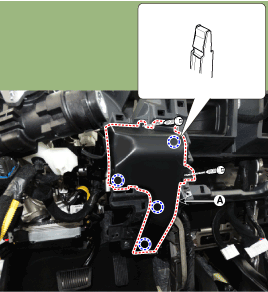
| 19. |
Loosen the mounting bolts and nuts and remove the main crash pad assembly
(A).
|
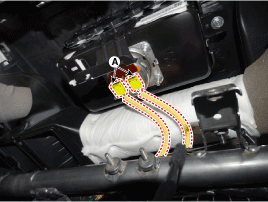
| 20. |
Disconnect the passenger's airbag connectors (A).
|
| 21. |
To install, reverse removal procedure.
|
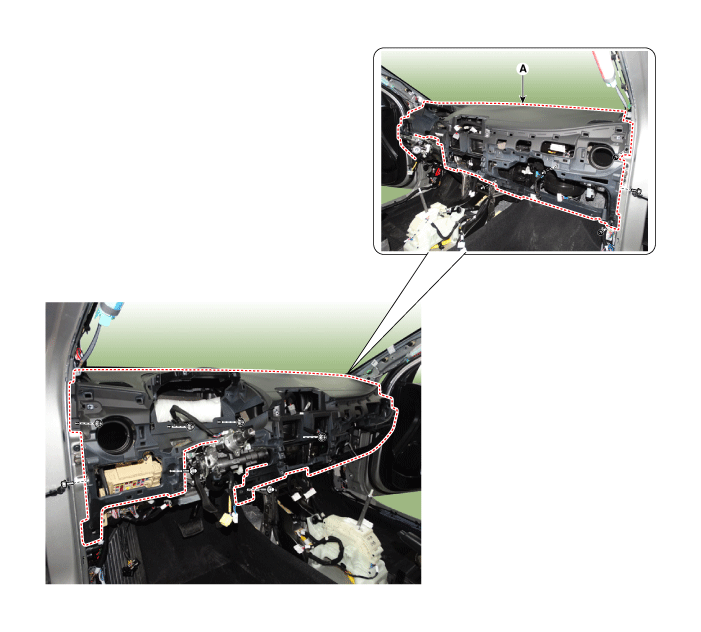
 Main Crash Pad Assembly Components and components location
Component Location
1. Main crash pad assembly
...
 Cowl Cross Bar Assembly Components and components location
Component Location
1. Cowl cross bar assembly
...
Other information:
Hyundai Kona (OS) 2018-2026 Service Manual: Repair procedures
Inspection
ABS System Bleeding
This procedure should be followed to ensure adequate bleeding of air and filling
of the ESC unit, brake lines and master cylinder with brake fluid.
1.
Remove the reservoir cap and fill the brake reservoir tank with brake
...
Hyundai Kona (OS) 2018-2026 Service Manual: Troubleshooting
Troubleshooting
Symptom
Probable cause
Remedy
play in steering
Loose yoke plug
Retighten
Loose steering gear mounting bolts
Retighten
Loose or worn tie rod end
...
© 2018-2026 www.hkona.com
