Hyundai Kona: Lubrication System / Oil Pressure Switch Repair procedures
| Removal and Installation |
| 1. |
Disconnect the battery negative terminal.
|
| 2. |
Remove the under cover.
(Refer to Engine and Transaxle Assembly - "Engine Cover")
|
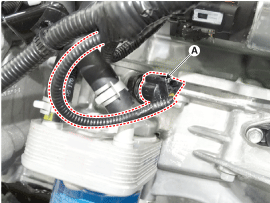
| 3. |
Remove the oil pressure switch connector (A).
|
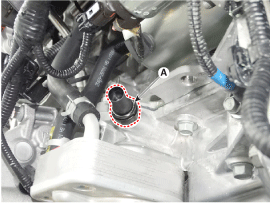
| 4. |
Remove the oil pressure switch (A).
|
| 5. |
Install in the reverse order of removal.
|

| Inspection |
| 1. |
Check the continuity between the terminal and the body with an ohmmeter.
If there is no continuity, replace the oil pressure switch.
|
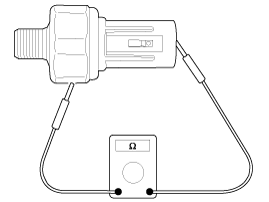
| 2. |
Check the continuity between the terminal and the body when the fine
wire is pushed.
If there is continuity even when the fine wire is pushed, replace the
switch.
|
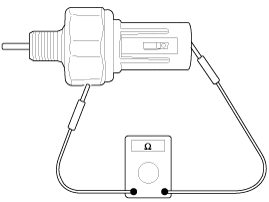
| 3. |
If there is no continuity when a 49.0kpa (0.5kg/cm², 7.1psi) is applied
through the oil hole, the switch is operating properly.
Check for air leakage. If air leaks, the diaphragm is broken.
Replace it.
|
 Engine Oil Repair procedures
Replacement
•
Prolonged and repeated contact with mineral oil will result
in t ...
 Oil Pan Components and components location
Components
1. Gasket
2. Oil screen
3. Oil pan
4. Drain plug gasket
5. Drain plug
...
Other information:
Hyundai Kona (OS) 2018-2026 Service Manual: Engine Coolant Temperature Sensor (ECTS) Repair procedures
Inspection
1.
Turn the ignition switch OFF.
2.
Remove the ECTS.
(Refer to "Removal")
3.
After immersing the thermistor of the sensor into engine coolant, measure
resistance between the EC ...
Hyundai Kona (OS) 2018-2026 Service Manual: Input shaft speed sensor 2 Repair procedures
Removal
1.
Remove the cleaner assembly and air duct.
(Refer to Engine Mechainical System - "Air Cleaner")
2.
Disconnect the Input shaft speed sensor connector (A).
3.
Remove the battery and ba ...
