Hyundai Kona: Seat Belt Pretensioner / Repair procedures
| Removal |
| 1. |
Disconnect the battery negative cable, and wait for at least three minutes
before beginning work.
|
| 2. |
Remove the seat belt lower anchor.
(Refer to Body - "Front Seat Belt")
|
| 3. |
Remove the door scuff trim.
(Refer to Body - "Interior Trim")
|
| 4. |
Remove the center pillar trim.
(Refer to Body - "Interior Trim")
|
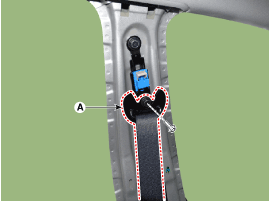
| 5. |
Remove the seat belt (A) after loosening the upper anchor bolt.
|
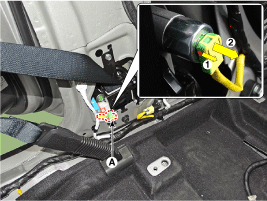
| 6. |
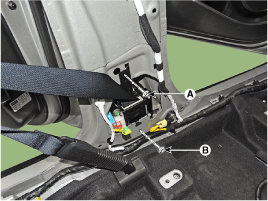
Disconnect the front seat belt pretensioner connector (A).
|
| 7. |
Remove the seat belt pretensioner (A) after loosening the seat belt
pretensioner mounting bolts.
|

| 1. |
Disconnect the battery negative cable, and wait for at least three minutes
before beginning work.
|
| 2. |
Remove the luggage side trim.
(Refer to Body - "Luggage Side Trim")
|
| 3. |
Remove the rear pillar trim.
(Refer to Body - "Rear Pillar Trim")
|
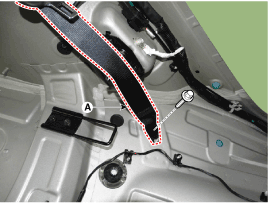
| 4. |
Remove the rear seat belt lower anchor (A) by loosening the mounting
bolts.
|
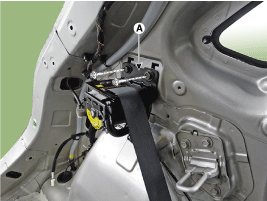
| 5. |
Loosen the mounting bolts and then remove the rear seat belt retractor
(A).
|
| Installation |
| 1. |
Remove the ignition key from the vehicle.
|
| 2. |
Disconnect the battery negative cable and wait for at least three minutes.
|
| 3. |
Install the seat belt pretensioner.
|
| 4. |
Connect the seat belt pretensioner connector.
|

| 5. |
Install the front seat belt (A) by tightening the upper anchor bolt.
|
| 6. |
Install the center pillar trim.
(Refer to Body - "Interior Trim")
|
| 7. |
Install the door scuff trim.
(Refer to Body - "Interior Trim")
|
| 8. |
Reconnect the battery negative cable.
|
| 9. |
After installing the seat belt pretensioner, confirm proper system operation:
|
| 1. |
Remove the ignition key from the vehicle.
|
| 2. |
Disconnect the battery negative cable and wait for at least three minutes.
|
| 3. |
Install the retractor (A).
|
| 4. |
Install the rear seat belt lower anchor (A).
|
| 5. |
Install the rear pillar trim.
(Refer to Body - "Rear Pillar Trim")
|
| 6. |
Install the luggage side trim.
(Refer to Body - "Luggage Side Trim")
|
| 7. |
Connect the battery negative cable.
|
| 8. |
After installing the seat belt pretensioner, confirm proper system operation:
|
 Description and operation
Description
The Seat Belt Pretensioners (BPT) are installed inside Center Pillar (LH & RH).
When a vehicle crashes with a certain degree of frontal impact, the pretensioner
s ...
 Brake System
...
Other information:
Hyundai Kona (OS) 2018-2026 Owners Manual: Electric Chromic Mirror (ECM)
The electric rearview mirror automatically controls the glare from the headlamp
of the vehicle behind you in nighttime or low light driving conditions.
When the engine is running, the glare is automatically controlled by the sensor
mounted in the rearview mirror. The sensor detects the light level ...
Hyundai Kona (OS) 2018-2026 Service Manual: Vacuum Pump Repair procedures
Removal
1.
Turn ignition switch OFF and disconnect the negative (-) battery cable.
2.
Check the safty after uplift the vehicle with lift.
3.
Remove the under cover.
(Refer to Engine Mechanical System - ...
