Hyundai Kona: Lighting System / Head Lamps Description and operation
| 1. |
Bulb
| (1) |
Elements
Xenon gas : Xenon gas activates the initial reaction for
rapid illuminating.
Molybdenum electrode: anode arcing
Metal halide salts : color composing component
|
| (2) |
Lightening principle
When Xenon gas and metal halide salt will discharge the
molybdenum anode in a capsule, it emits light.
|
|
| 2. |
Ignitor
Ignitor (A) is an electromagnetic transformer that receives current
from ballast and boost voltage to light on the arc light source
in any environment.
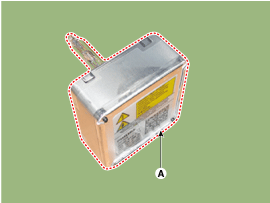
|
| 3. |
Ballast
| (1) |
Ballast (A) delivers an instant high voltage pulse to the
ignitor electrode, to initialize discharge in the source.
|
| (2) |
Ballast supplies the stable power to the bulb and the ignitor
during initialization and normal state of arc.
|
|
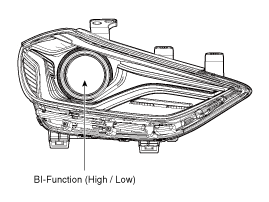
BI-Function Head Lamp (Sport only)
| 1. |
Definition
| – |
A headlamp with integrated functions of high and low beam.
|
| – |
The light is controlled by rotating the shield inserted
to the lens (A solenoid is adopted)
|
|
| 2. |
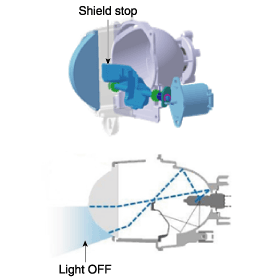
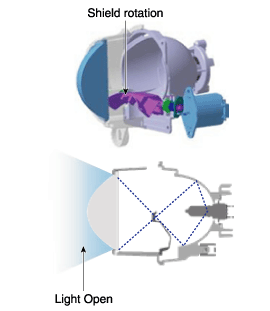
Structure and mechanism
| – |
in case of working as a low beam
: Only the low beam illuminates as the stopped shield blocks
off the light.
|
| – |
in case of working as a high beam
: The light is not blocked off by the open shield so the
light illuminates in the high beam area.
|
|
Components
[Standard (LED)
1. Head lamp (Low)
2. Head lamp (High)
4. Dust cap
[Standard (LED)]
1 ...
Head Lamp Aiming Instructions
[Mechanical Aiming]
The head lamps should be aimed with the proper beam-setting equipment, and
in accordance with the equipment manufactur ...
Other information:
Hyundai Kona (OS) 2018-2026 Owners Manual: System operation
Ventilation
1. Set the mode to the position.
2. Set the air intake control to the outside (fresh) air position.
3. Set the temperature control to the desired position.
4. Set the fan speed control to the desired speed.
Heating
1. Set the mode to the position.
2. Set the air intake control to the o ...
Hyundai Kona (OS) 2018-2026 Service Manual: Reservoir Tank Repair procedures
Removal and Installation
1.
Loosen the drain plug and drain the coolant and remove the radiator
cap to speed draining.
(Refer to Cooling System - "Coolant")
2.
Disconnect the over flow hose (A) and cooling hose (B).
...

 Head Lamps Components and components location
 Head Lamps Repair procedures