Hyundai Kona: Liftgate / Liftgate Trim Repair procedures
Hyundai Kona (OS) 2018-2026 Service Manual / Body (Interior and Exterior) / Liftgate / Liftgate Trim Repair procedures
| Replacement |
[Liftgate lower trim]
|

|

| 1. |
Using a screwdriver or remover, remove the pull handle (A).
|
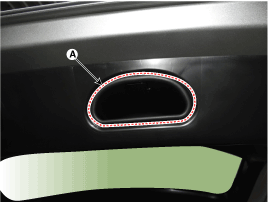
| 2. |
After loosening the mounting screws and fastner remove the liftgate
lower trim (A).
|
| 3. |
To install, reverse removal procedure.
|

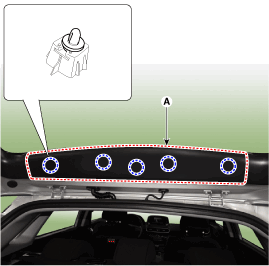
[Liftgate upper trim]
|
|
| 1. |
Using a screwdriver or remover, remove the liftgate upper trim (A).
|
| 2. |
To install, reverse removal procedure.
|
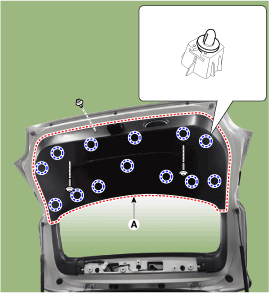
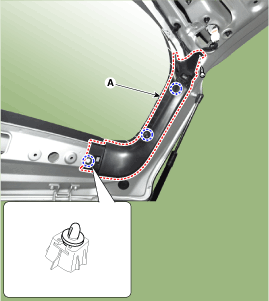
[Liftgate side trim]
|
|
| 1. |
Remove the liftgate upper & lower trim.
(Refer to Liftgate - "Liftgate Trim")
|
| 2. |
After loosening the mounting screw, remove the liftgate side trim (A).
|
| 3. |
To install, reverse removal procedure.
|
 Liftgate Trim Components and components location
Component Location
1. Liftgate trim
...
 Liftgate Lift Repair procedures
Replacement
•
Take care to not let the liftgate fall on you as the lifts are
r ...
Other information:
Hyundai Kona (OS) 2018-2026 Owners Manual: Detecting pedestrians
The sensor may be limited when:
The pedestrian is not fully detected by the camera recognition system,
for example, if the pedestrian is leaning over or is not fully walking upright
The pedestrian is moving very quickly or appears abruptly in the camera
detection area
The pedestrian is weari ...
Hyundai Kona (OS) 2018-2026 Service Manual: Side Impact Sensor (SIS) Repair procedures
Removal
Pressure Side Impact Sensor
•
Removal of the airbag must be performed according to the precautions/procedures
described previously.
•
...
© 2018-2026 www.hkona.com
