Hyundai Kona: Evaporative Emission Control System / Canister Repair procedures
Hyundai Kona (OS) 2018-2026 Service Manual / Emission Control System / Evaporative Emission Control System / Canister Repair procedures
| Removal |
| 1. |
Turn ignition switch OFF and disconnect the negative (-) battery cable.
|
| 2. |
Lift the vehicle.
|
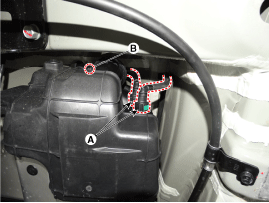
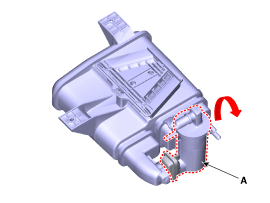
| 3. |
Disconnect the vapor hose quick-connector (A).
|
| 4. |
Disconnect the ventilation hose quick-connector (B).
|
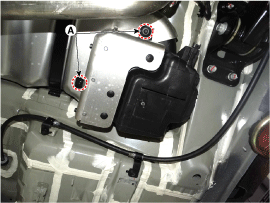
| 5. |
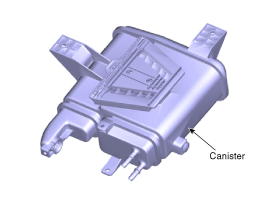
Remove the canister assembly after loosening bolts (A).
|
| 6. |
Remove the canister protector (A) after loosening bolt & clips.
|
| 7. |
Remove the canister cover (A) after loosening bolt & clips.
|
| 8. |
Remove the clip, and then separate the fuel tank air filter (B) from
the canister after rotating it in the direction of the arrow in the
figure.
|
| Inspection |
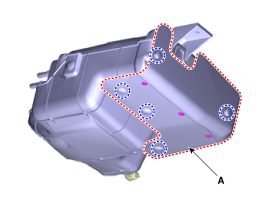
| 1. |
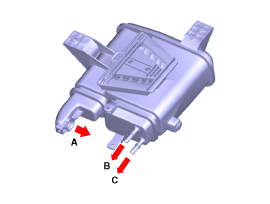
Check for the following items visually.
A : Canister ↔ Atmosphere
B : Canister ↔ Fuel Tank
C : Canister ↔ Intake Manifold
|
| Installation |
| 1. |
Install in the reverse order of removal.
|
 Repair procedures
Inspection
[System Inspection]
1.
Disconnect the vapor hose from the intake manifold and connect a vacuum
pump to the nipple on the intake manifold.
...
 Fuel Tank Air Filter Repair procedures
Removal
1.
Turn ignition switch OFF and disconnect the negative (-) battery cable.
2.
Lift the vehicle.
3.
Rem ...
Other information:
Hyundai Kona (OS) 2018-2026 Owners Manual: Drive Info display
This display shows the trip distance (1), the average fuel economy (2), and the
total driving time (3).
The information is combined for each ignition cycle. However, when the engine
has been OFF for 4 hours or longer the Drive Info screen will reset.
To manually reset the information, press and h ...
Hyundai Kona (OS) 2018-2026 Service Manual: Front Seat Shield Inner Cover Components and components location
Component Location
1. Front seat shield inner cover
...
© 2018-2026 www.hkona.com
