Hyundai Kona: Front Suspension System / Front Strut Assembly Repair procedures
Hyundai Kona (OS) 2018-2026 Service Manual / Suspension System (NON-ECS) / Front Suspension System / Front Strut Assembly Repair procedures
| Removal |
| 1. |
Loosen the wheel nuts slightly.
Raise the vehicle, and make sure it is securely supported.
|
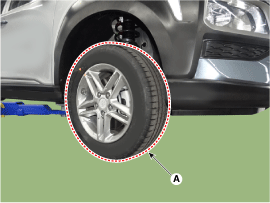
| 2. |
Remove the front wheel and tire (A) from the front hub.
|

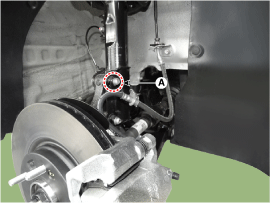
| 3. |
Loosen the mounting bolt (A) and then remove the brake hose from the
strut assembly.
|
| 4. |
Disconnect the stabilizer link with the front strut assembly after loosening
the nut (A).
|
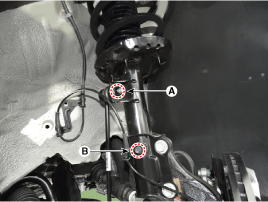
| 5. |
Loosen the mounting bolt (B) and then remove the wheel speed sensor
cable from the strut assembly.
|
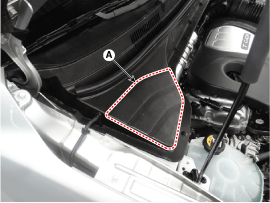
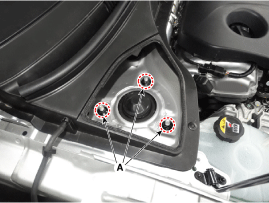
| 6. |
Remove the cowl top service cover (A).
|
| 7. |
Loosen the upper strut mounting nuts (A).
|
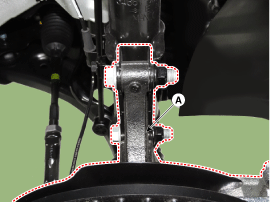
| 8. |
Disconnect the front strut assembly with the front axle (A) by loosening
the bolts & nuts.
|
| Installation |
| 1. |
Install in the reverse order of removal.
|
| Disassembly |
|

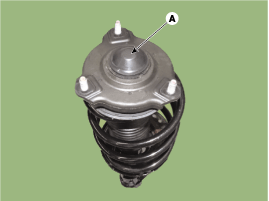
| 1. |
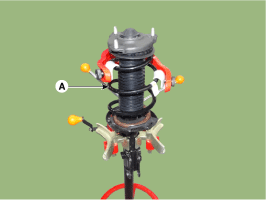
Remove the insulator dust cover (A).
|
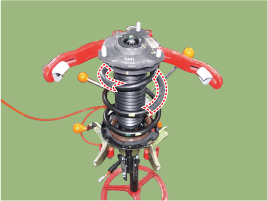
| 2. |
Using the spring compressor, compress the coil spring (A).
Do not compress the spring more than necessary.
|
| 3. |
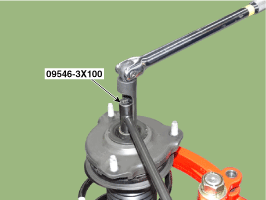
Using SST (09546-3X100), loosen the self locking nut.
|
| 4. |
Remove the insulator, spring pad, coil spring and dust cover from the
strut assembly.
|
| Inspection |
| 1. |
Check the strut bearing for wear and damage.
|
| 2. |
Check the spring upper and lower seat for damage and deterioration.
|
| 3. |
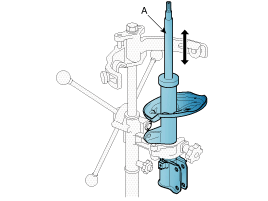
Compress and extend the piston rod (A) and check that there is no abnormal
resistance or unusual sound during operation.
|
| Disposal |
| 1. |
Fully extend the piston rod.
|
| 2. |
Drill a hole on the A section to remove gas from the cylinder.
|

| Ressembly |
| 1. |
Install the insulator, spring pad, coil spring and dust cover from the
strut assembly.
|
| 2. |
Compress and extend the piston rod (A) and check that there is no abnormal
resistance or unusual sound during operation.
|
| 3. |
Using the special tool (09546-3X100), install the self locking nut.
|
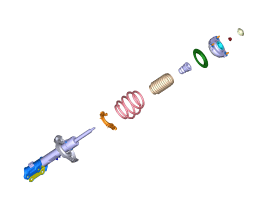
 Front Strut Assembly Components and components location
Components
1. Strut assembly
2. Insulator dust cover
3. Self locking nut
4. Insulator assembly & sturt bearing
5. Spring upper pad
6. Bumper rubber ...
 Front Lower Arm Components and components location
Components
1. Ball joint assembly
2. Front lower arm assembly
...
Other information:
Hyundai Kona (OS) 2018-2026 Service Manual: ESP OFF Switch Description and operation
Description
1.
The ESP OFF switch is for the user to turn off the ESP system.
2.
The ESP OFF lamp is on when ESP OFF switch is engaged.
...
Hyundai Kona (OS) 2018-2026 Owners Manual: Drive Info display
This display shows the trip distance (1), the average fuel economy (2), and the
total driving time (3).
The information is combined for each ignition cycle. However, when the engine
has been OFF for 4 hours or longer the Drive Info screen will reset.
To manually reset the information, press and h ...
© 2018-2026 www.hkona.com
