| 6. |
Adjust the intake and exhaust valve clearance.
| (1) |
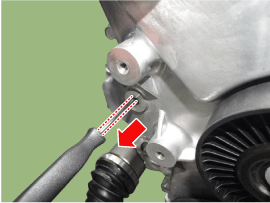
Remove the service hole bolt (A).
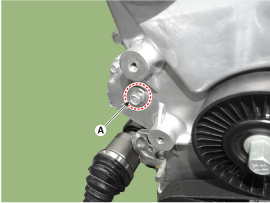
|
| (2) |
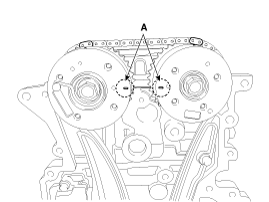
Lock the timing chain tensioner in the fully retracted position.
Insert a pick into the service hole in the timing chain cover
and lower the hole in the left side of the ratchet plate (A)
on the tensioner to allow the pawl (B : located inside the tensioner
behind the rachet plate) to be lifted.

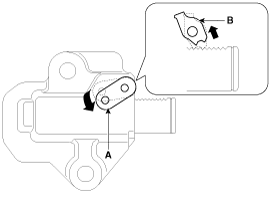
|
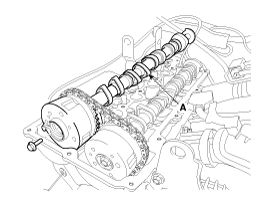
| (3) |
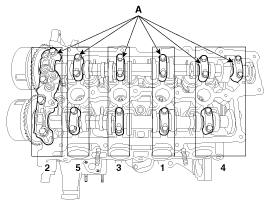
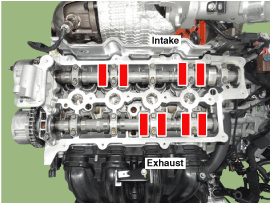
Remove the camshaft bearing caps (A) with the order below.
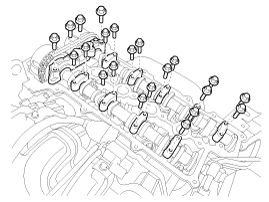
|
| (4) |
With the pawl lifted, have a helper pull up the exhaust CVVT
& camshaft (A) to allow the tensioner plunger (B) to retract.
|
| (5) |
With the tensioner plunger in the fully retracted position,
raise the hole in the left side of the ratchet plate (A) again
through the service hole in the chain cover to align the ratchet
plate hole with the hole in the tensioner body behind the ratchet
plate, then lock the tensioner by inserting the pick through
the ratchet plate and tensioner body holes.
|
| (6) |
Separate the exhaust camshaft (A) from the exhaust CVVT by removing
the bolt.
|
• |
When installing the CVVT assembly bolt, hold
the camshaft with a wrench to prevent the camshaft
from rotating.
|
|
|
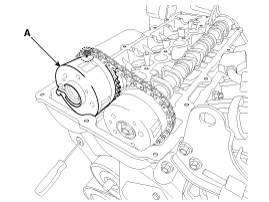
| (7) |
Remove the exhaust CVVT (A) from the timing chain.
|
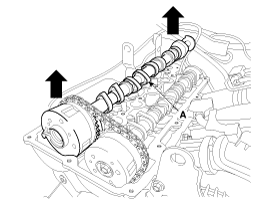
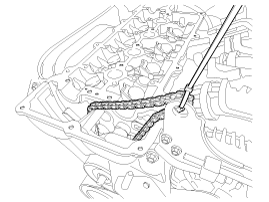
| (8) |
Remove the intake CVVT & camshaft (A).

|
• |
Fasten the timing chain to the engine hanger
with a cable tie or strap not to allow the timing
chain to fall down when removing the intake
CVVT & camshaft.
|
|
|
| (9) |
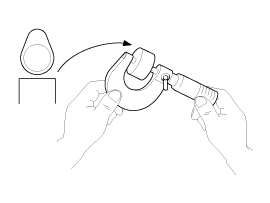
Measure the thickness of the removed tappet using a micrometer.
|
| (10) |
Calculate the thickness of a new tappet so that the valve clearance
comes within the specificified value.
|
Valve clearance (Engine coolant temperature : 20°C)
T : Thickness of removed tappet
A : Measured valve clearance
N : Thickness of new tappet
Intake : N = T + [A - 0.20mm(0.0079in.)]
Exhaust : N = T + [A - 0.25mm (0.0098in.)]
|
|
| (11) |
Select a new tappet with a thickness as close as possible to
the caculated value.
|
• |
Shims are available in 41 size increments of
0.015mm (0.0006in.) from 3.00mm (0.118in.) to
3.690mm (0.1417in.)
|
|
|
| (12) |
Place a new tappet on the cylinder head.
|
| (13) |
Install the intake CVVT & camshaft (A), with the timing mark
on the intake CVVT sprocket aligned with the mark (painted link)
on the timing chain.
|
| (14) |
Install the exhaust CVVT (A), with the timing mark on the exhaust
CVVT sprocket aligned with the mark (painted link) on the timing
chain.
|
| (15) |
Install the exhaust camshaft (A) to the exhaust CVVT.
|
Tightening torque :
63.7 - 73.5 N.m (6.5 - 7.5 kgf.m, 47.0 - 54.2 lb-ft)
|
|
| (16) |
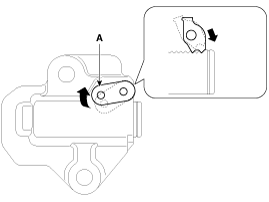
Remove the pick from the service hole in the timing chain cover.
|
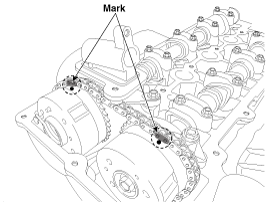
| (17) |
Check that each timing mark of the intake and exhaust CVVT sprockets
is aligned as shown in the picture.

|
| (18) |
Install the service holebolt (A).
|
Tightening torque :
27.5 - 30.4 N.m (2.8 - 3.1 kgf.m, 20.3 - 22.4 lb-ft)
|
|
| (19) |
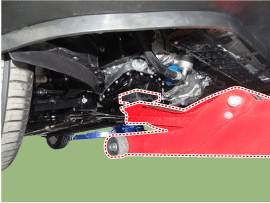
Install the engine mounting support bracket.
(Refer to Engine and Transmission Assembly - "Engine Mounting")
| (1) |
Connect the engine ground cable (A).
|
Tightening torque :
10.8 - 13.7 N.m (1.1 - 1.4 kgf.m, 8.0 - 10.1
lb-ft)
|
|
| (2) |
Remove the jack from the oil pan.
|
|
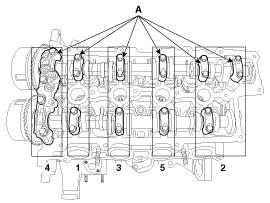
| (20) |
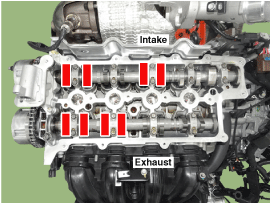
Install the camshaft bearing caps (A) with the order below.
|
Tightening torque
1st step
M6 bolt :
5.9 N.m (0.6 kgf.m, 4.3 lb-ft)
M8 bolt :
9.8 N.m (1.0 kgf.m, 7.2 lb-ft)
2nd step
M6 bolts :
11.8 - 12.7 N.m (1.2 - 1.3 kgf.m, 8.7 - 9.4 lb-ft)
M8 bolts :
18.6 - 22.6 N.m (1.9 - 2.3 kgf.m, 13.7 - 16.6 lb-ft)
|
|
| (21) |
Turn the crankshaft two turns in the operating direction(clockwise)
and check that the marks of the intake and exhaust CVVT sprockets
are in straight line on the cylinder head surface.
|
| (22) |
Recheck the valve clearance.
|
Valve clearance (Engine coolant temperature : 20°C)
[Specification]
Intake : 0.17 - 0.23 mm (0.0067 - 0.0091 in.)
Exhaust : 0.32 - 0.38 mm (0.0126 - 0.0150 in.)
|
|
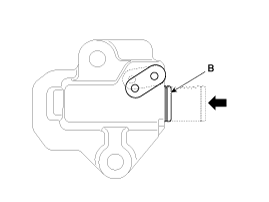
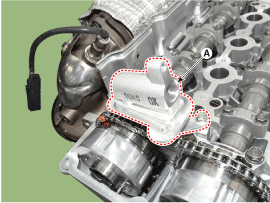
| (23) |
Install the exhaust oil control valve (OCV) adaptor (A).
|
Tightening torque :
9.8 - 11.8 N.m (1.0 - 1.2 kgf.m, 7.2 - 8.7 lb-ft)
|
|
• |
When installing the oil control valve (OCV)
adapter, check the front cam cap o-ring.
|
|
|
| (24) |
Install the cylinder head cover.
(Refer to Cylinder Head Assembly - "Cylinder Head Cover")
|
|


 Components and components location
 Cylinder Head Cover Components and components location